mobility

How Diaphragm Function and Breathing May Improve Strength, Balance, and Recovery

Part 2: Improving Force Production and Movement From Head to Toe

Written by Michael Crawley, BSc, BPT, CSCS

Part 1 of this series looked at how jaw and tongue position influence force output and function. Part 2 turns to the diaphragm and breathing, and how they influence those same systems. As you'll see, good tongue and jaw function and good diaphragm function are closely connected, each affecting the other.

For a healthy individual, the diaphragm works through roughly 18,000 to 30,000 breaths a day. Breathing rate is largely involuntary, generated by the brainstem, but we can also consciously control it for more deliberate tasks.

Learning to influence your breathing can improve athletic performance, reduce some of the risks associated with aging, and support recovery. Before getting into that, here's a quick look at the anatomy involved.

Anatomy

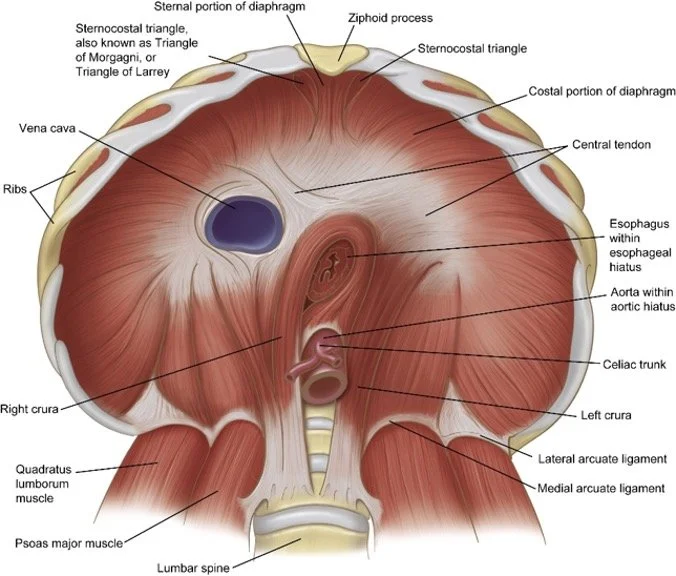
The diaphragm's anatomy is complex, with connection points throughout the body. These connections include the sternum, ribs, and lumbar spine. The diaphragm also has openings that allow passage for major vessels such as the aorta and esophagus, creating a functional link between the thorax above and the abdomen below (Bordoni & Zanier, 2013).

Neural drive to the diaphragm comes from the cervical spine (C3, C4, C5), often remembered with the cue “C3-4-5 keeps the diaphragm alive.” Another key input comes from the vagus nerve, which helps regulate the depth and frequency of diaphragmatic movement, and plays an especially important role in the parasympathetic (“rest and digest”) side of breathing. These details set up the mechanisms discussed below, and help explain how to bias breathing for different outcomes.

Diaphragm, Valsalva, and Force Production

You've probably heard the cue “use your core” in gym and sport settings. It's not a particularly useful instruction, and it often gets misread as crunching the abdominals down and forward. That doesn't support what we call The Stack at Avos Strength, and it doesn't create an efficient system for force production.

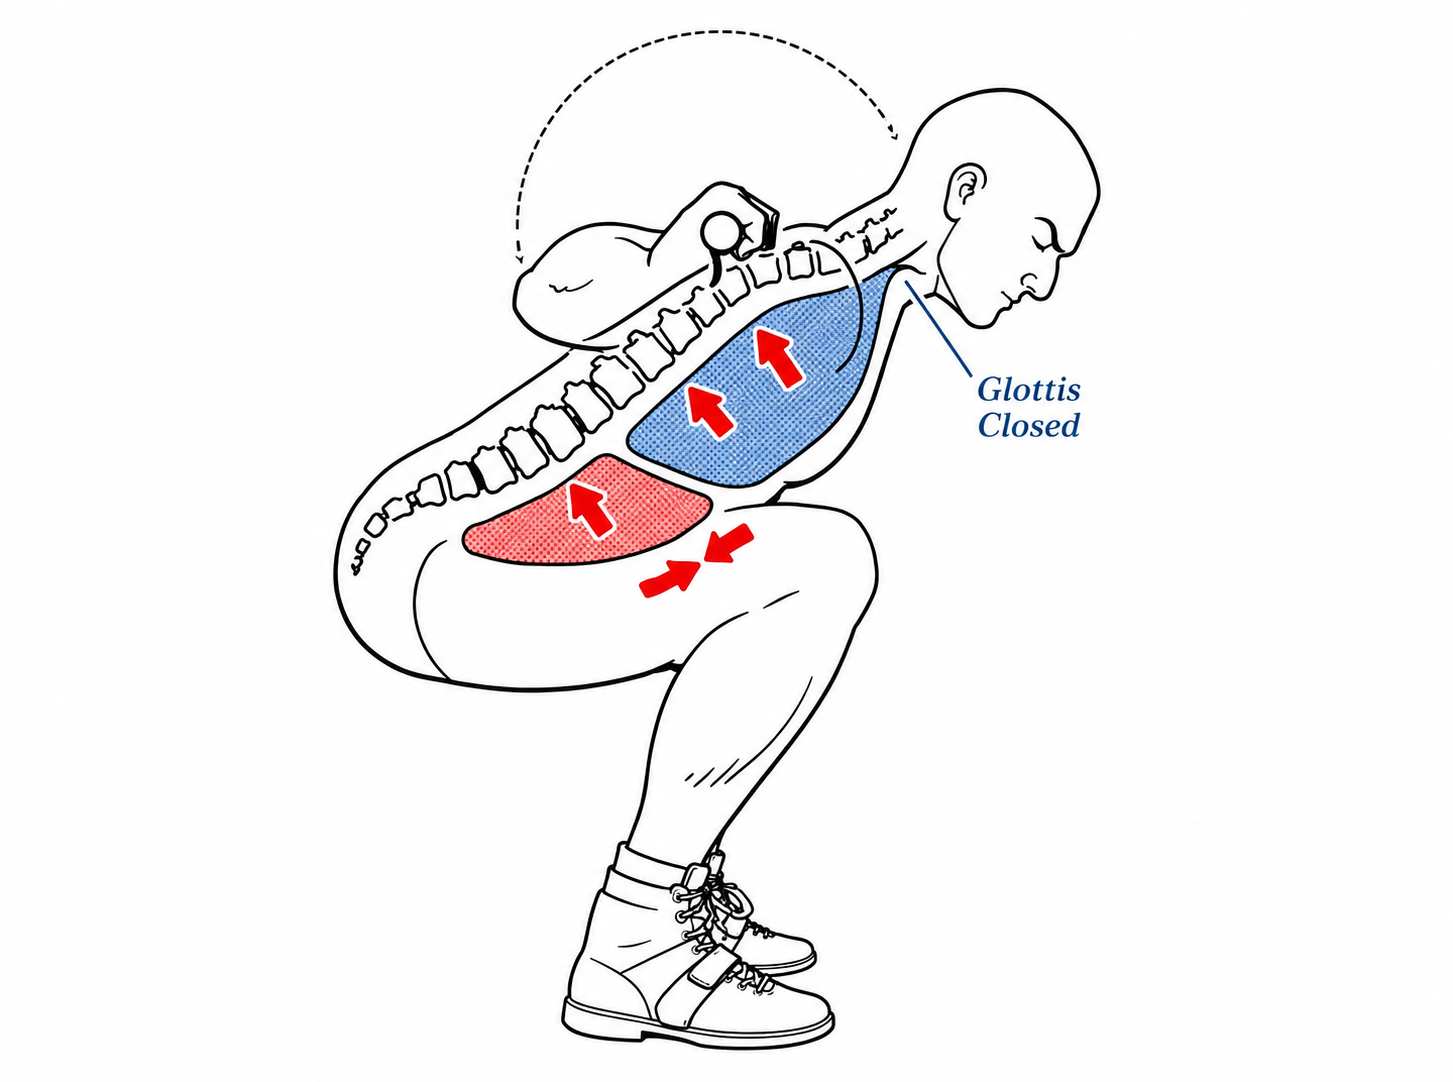
As you inhale and exhale, the diaphragm's movement changes lung volume, which can be used to increase intra-abdominal pressure (IAP). This pressure allows the breath, abdominal muscles, and back muscles to work together, improving spinal stability and force production (Guo et al., 2021).

The Valsalva maneuver (VM) is a forceful exhale against a closed airway. Lifting heavy loads, or lighter loads close to failure, naturally creates a brief VM (Hackett & Chow, 2013). Combined with increased IAP, this is thought to improve spinal stability and allow for more efficient force production.

Disclaimer: Confirm with a healthcare provider that increasing training intensity or intentionally using the Valsalva maneuver is appropriate for you before adding it to your training.

Coach demonstrating bracing and the Valsalva maneuver during a heavy squat

A common strategy is to crunch the abdominals aggressively, which shortens the abdominal muscles and pulls the chest forward. Ironically, this limits the diaphragm's ability to descend and air to enter the thorax. To make this more concrete, here's a simple bracing sequence using the squat as an example:

  1. Standing / prep: A gentle breath in, ideally through the nose.

  2. Standing / prep: A slow, relaxed exhale through the mouth to generate abdominal tension.

  3. Immediately pre-squat: A slight re-inhale to increase pressure against the abdominal wall.

  4. Bottom position: An exhale against a closed mouth or pursed lips if the weight is heavy or fatigue is building.

For a step-by-step walkthrough, see this short video: The Myth of Bracing.

There's nuance here depending on load and volume. For example:

  • At higher intensity (4 sets of 3 reps at 80% 1RM), you might reset your brace and breath every rep, or every second rep, using step 4 each time.

  • At higher volume with lower intensity (3 sets of 6 reps at 70% 1RM), you might complete the first 3 to 4 reps without resetting, and without needing a forceful exhale against a closed mouth. Step 4 might only be needed on the last rep or two.

This sequence isn't necessary for every movement. Relaxed, lower-intensity work without a deliberate brace and Valsalva maneuver is a perfectly healthy strategy for exercises such as:

  • Jefferson curl variations

  • Spinal flow and rotational work

  • Lower-intensity isometric work with continuous breathing

Now, from force production to the softer, broader effects of the diaphragm and breathing.

Further Roles and Influence

1. Proprioception, Balance, and Coordination

Proprioception (your sense of position in space), balance, and coordination are constant, everyday requirements, drawing on input from the inner ear, muscles, eyes, and nervous system. As people age, this information tends to travel less quickly and smoothly, which raises the risk of falls and related injuries. Balance exercises, walking on uneven ground, and visual exercises can all help offset that risk.

The diaphragm plays a role here too. Through its relationship with visceral fat, the diaphragm is itself a source of proprioceptive feedback (Bordoni & Zanier, 2013). Nazir et al. (2026) found that diaphragmatic breathing exercises improved balance confidence, reduced fatigue, and improved gait velocity in older adults.

The exercise used to produce that improvement was simple:

  • Twice a week: 2 rounds of 6 minutes of focused diaphragmatic breathing.

  • Diaphragmatic breathing: one hand on the chest, one hand on the belly button. Breathe in through the nose for 4 seconds, out through the mouth for 6 seconds.

No equipment, minimal time, and a meaningful reduction in fall risk. That's a good example of how much reach this type of training can have.

2. Restoration and Recovery

Many people are good at the hard side of training: pushing through a tough session, finishing a hard interval workout. Deliberate breathing plays an important role there, as discussed above, but recovery and downregulation matter just as much.

As mentioned in the anatomy section, the vagus nerve supplies the diaphragm and is tied to the rest-and-digest side of the nervous system. Slower, relaxed, mindful breathing after high-intensity activity can help activate the parasympathetic nervous system. Research has linked this to reductions in heart rate and respiration rate, and improvements in heart rate variability (Renaghan et al., 2023). See also Why Your Training Program Won't Work Without Sleep, Nutrition, and Recovery for more on why recovery deserves this kind of attention.

A simple way to introduce this: find a comfortable position (sitting, lying flat, or on your side) and take 10 to 20 relaxed breaths in through the nose and out through the mouth. Beyond supporting recovery, it also bookends the workout, creating a clear separation between the hard and the soft.

These are two of many ways the diaphragm and breathing influence training and daily life. There's a lot of literature on specific breathing styles (box breathing, Buteyko, and others), which can get overwhelming quickly. The simplest entry point is just adding short periods of focused, intentional breathing: relaxed in through the nose, slightly prolonged out through the mouth.

How to Apply This in Training

  • Resistance training: Don't crunch the abdominals. Use a deliberate inhale-exhale to create stiffness before the movement. If appropriate, incorporate the Valsalva maneuver on higher-intensity efforts or more fatiguing higher-rep sets.

  • Balance and proprioception: For older adults, add 2 sessions per week of 10 to 15 minutes of deliberate breathing practice to help offset age-related balance and fall risk.

  • Restoration: Use relaxed breathing in a comfortable position after hard training to support recovery and help the body absorb the training stimulus.

Key Takeaways

  • The diaphragm supports force production during strength training, largely through its role in generating intra-abdominal pressure.

  • Deliberate breathing, not aggressive crunching, is what creates a stable, braced trunk.

  • Diaphragmatic breathing can meaningfully improve balance and reduce fall risk in older adults, with just a few minutes of practice per week.

  • Slow, relaxed breathing after training helps activate recovery through the parasympathetic nervous system.

  • Simple, short breathing practices, done consistently, offer an outsized return relative to the effort involved.

Next Up

Moving down the body: the next post in this series will cover foot pressure and foot strength, and how they relate to force production, balance, and longevity, in the gym, in sport, and in everyday life.

References

Bordoni, B., & Zanier, E. (2013). Anatomic connections of the diaphragm: Influence of respiration on the body system. Journal of Multidisciplinary Healthcare, 6, 281–291. https://doi.org/10.2147/JMDH.S45443

Guo, J., et al. (2021). Embodiment of intra-abdominal pressure in a flexible multibody model of the trunk and the spinal unloading effects during static lifting tasks. Biomechanics and Modeling in Mechanobiology, 20(4), 1599–1626. https://doi.org/10.1007/s10237-021-01465-1

Hackett, D. A., & Chow, C.-M. (2013). The Valsalva maneuver: Its effect on intra-abdominal pressure and safety issues during resistance exercise. Journal of Strength and Conditioning Research, 27(8), 2338–2345. https://doi.org/10.1519/JSC.0b013e31827de07d

Nazir, S., et al. (2026). The effect of diaphragmatic breathing and diaphragmatic mobilization on physical performance, fear of falling, and quality of life in community-dwelling older adults: A randomized controlled trial. PLoS ONE, 21(1), e0339868.

Renaghan, E., et al. (2023). The effects of relaxation techniques following acute, high intensity football training on parasympathetic reactivation. Frontiers in Sports and Active Living, 5. https://doi.org/10.3389/fspor.2023.1267631

What Is the Stack? How Rib Cage and Pelvis Position Affect Movement

Written by Evelyn Calado, MKin, CSCS, RKin

If you've trained at Avos Strength for any length of time, you've probably heard us talk about "the stack."

Whether we're coaching a squat, a deadlift, a breathing drill, a carry, or simply standing posture, the concept comes up repeatedly.

That's because the stack is one of the foundational principles that influences how we breathe, move, stabilize, and produce force.

While it may seem like a small detail, it often has a significant impact on movement quality and performance.


What Is the Stack?

At its simplest, the stack refers to the relationship between the rib cage and the pelvis.

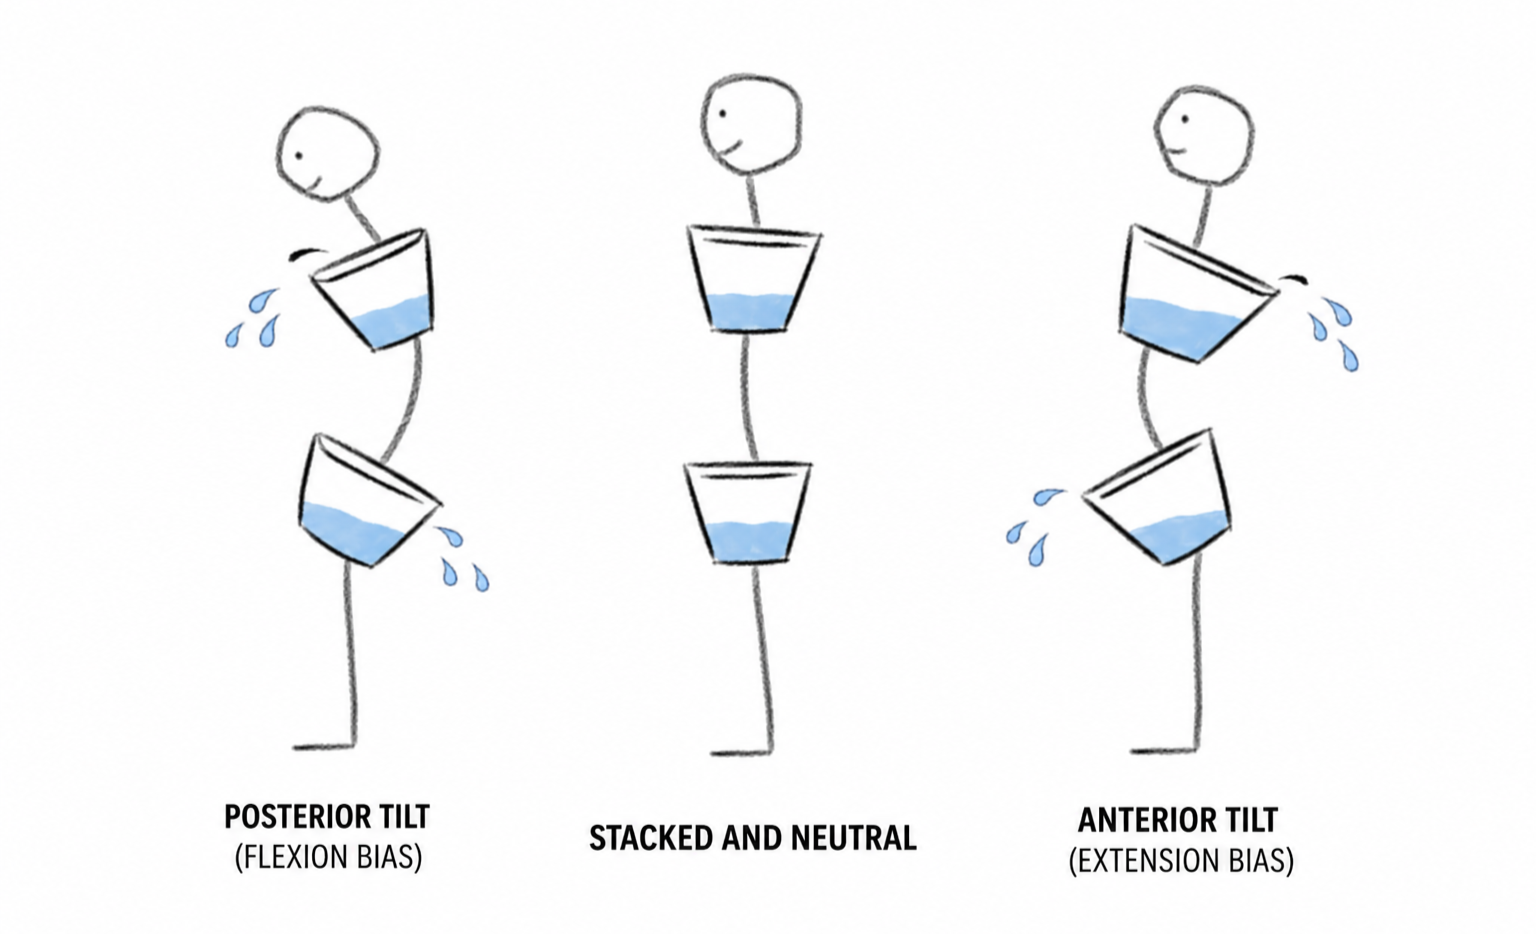
One way to visualize this is to think of both the rib cage and pelvis as buckets of water. When the buckets are stacked on top of one another and remain relatively level, the body is generally in a better position to manage pressure, breathe efficiently, and move well.

When either bucket tips excessively forward or backward, the relationship between the rib cage and pelvis changes. The body may then rely on compensatory strategies to create stability, manage pressure, or access movement.

While no one maintains a perfectly stacked position all the time, this analogy provides a useful framework for understanding why rib cage and pelvic position matter.

Illustration comparing posterior pelvic tilt, stacked neutral posture, and anterior pelvic tilt using a bucket analogy for rib cage and pelvis alignment

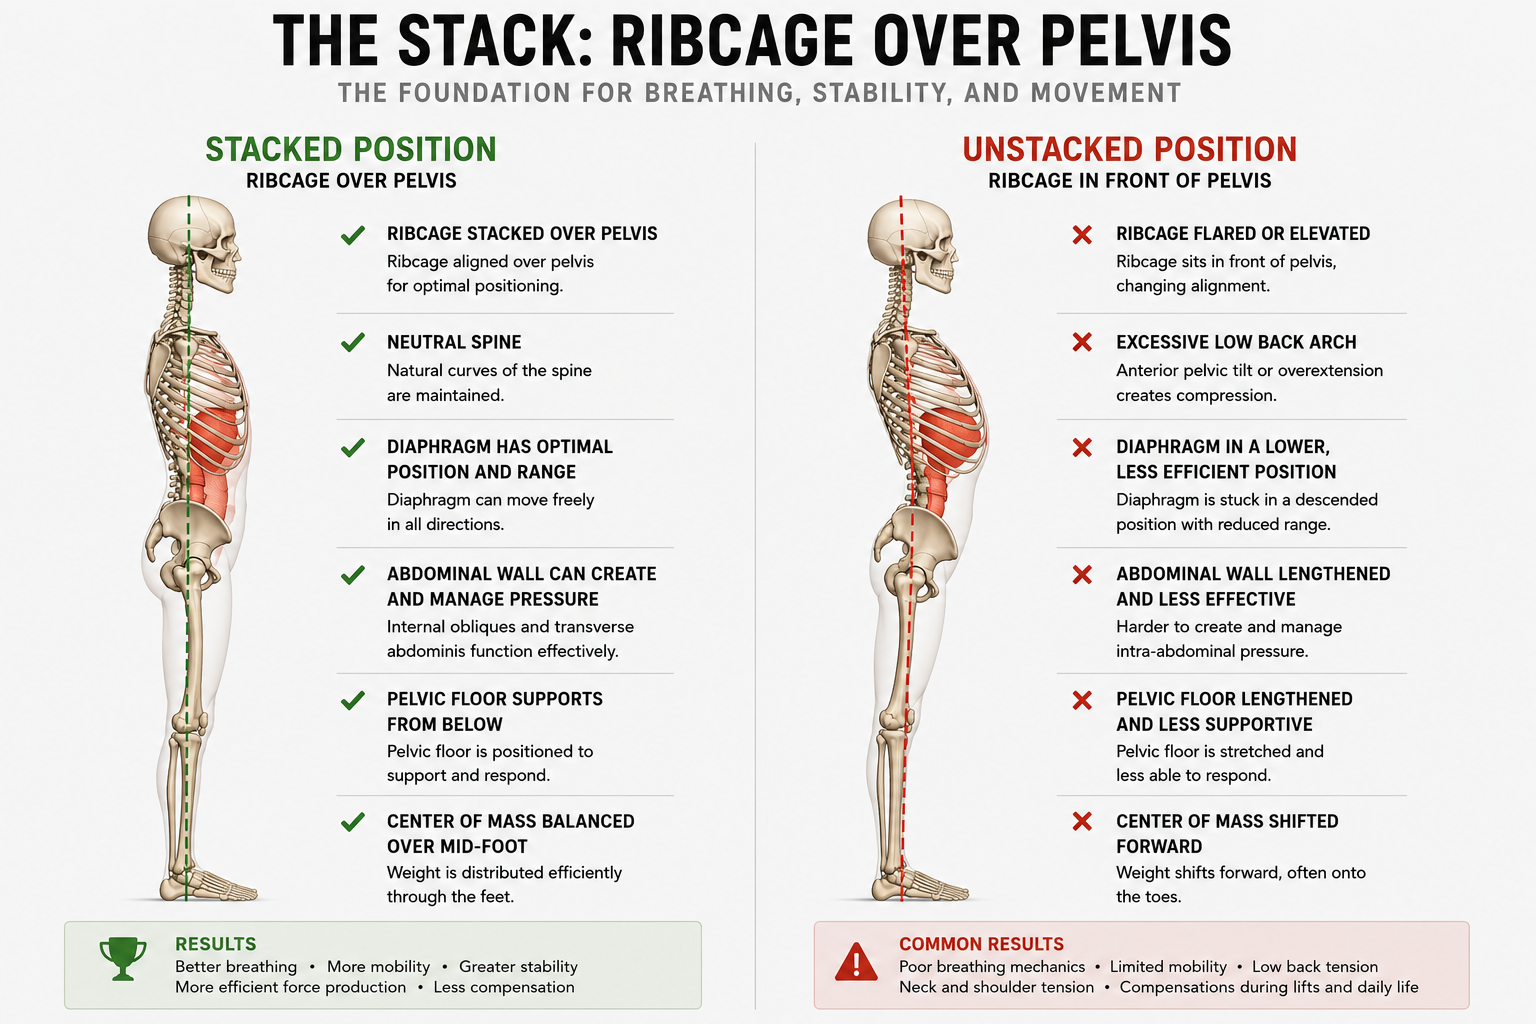
When we talk about being stacked, we're generally referring to the rib cage being positioned over the pelvis.

This doesn't mean flattening the spine, tucking the pelvis excessively, or walking around with your ribs permanently pulled down.

A stacked position still maintains the natural curves of the spine. Instead, it creates an environment where the body can effectively manage pressure, breathe efficiently, and move through available ranges of motion.

From a biomechanical perspective, stacking helps align the thoracic diaphragm and the pelvic floor. These structures form the top and bottom of a pressure system that works together with the abdominal wall to create stability throughout the trunk.

When the rib cage and pelvis are positioned well relative to one another, the body has a stronger foundation from which movement can occur.

Skeletal comparison of a stacked rib cage over pelvis position versus an unstacked, flared rib cage position and their effects on breathing and stability

Why We Coach the Stack

Many people think of strength, mobility, and stability as separate qualities.

In reality, they are deeply connected.

One of the primary reasons we coach the stack is because it influences the body's ability to manage pressure.

The diaphragm sits at the top of the abdominal cavity. The pelvic floor sits at the bottom. The internal obliques, transverse abdominis, and other abdominal muscles form the walls of this cylinder.

Together, these structures help regulate intra-abdominal pressure.

This pressure system plays a critical role in spinal stability, force transfer, breathing mechanics, and movement efficiency.

When pressure is managed effectively, the body is often able to access movement options more easily and distribute forces more efficiently.

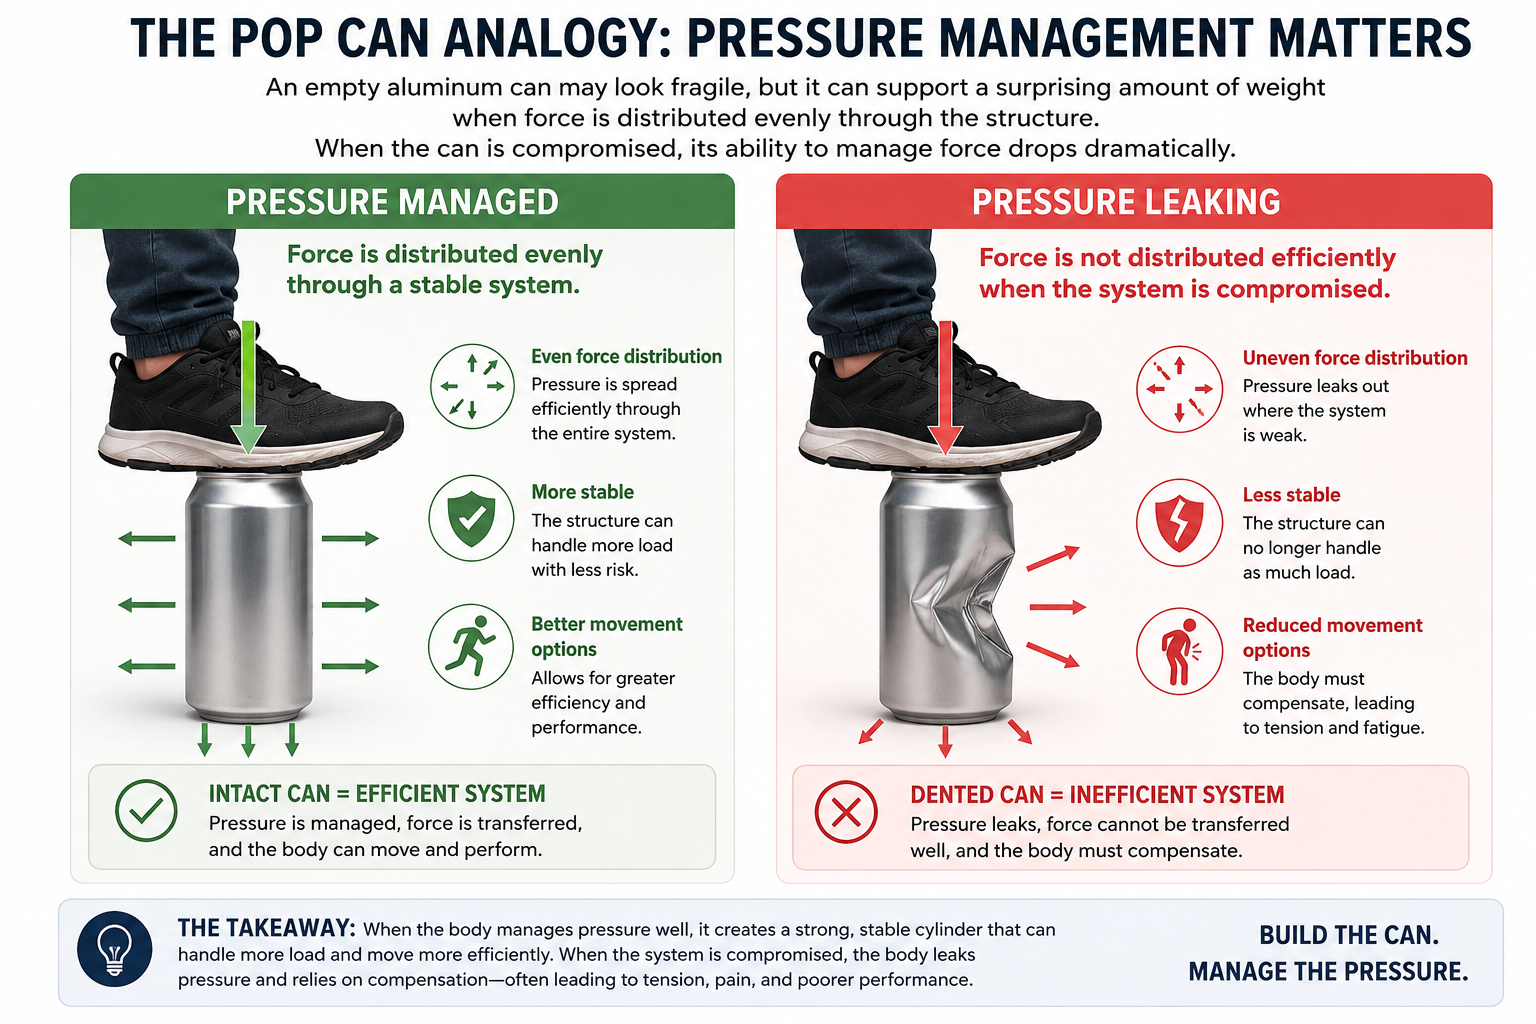
A useful way to think about this is to imagine an empty aluminum pop can. Despite being made of very thin metal, an undamaged can can support a surprising amount of weight when force is distributed evenly through the structure. The moment the side of the can is dented, however, its ability to manage force drops dramatically.

While the human body is far more complex than a pop can, the analogy illustrates an important principle. When the diaphragm, abdominal wall, pelvic floor, rib cage, and pelvis work together to manage pressure, the trunk becomes remarkably efficient at transferring and resisting force.

Pop can analogy illustrating how even pressure distribution keeps a structure stable, compared to a dented can that loses support

When pressure management is compromised, the body may begin relying on compensatory strategies to create stability and movement.

The stack is not the solution to every problem, but it often provides the foundation that allows other solutions to work.

How the Stack Affects Breathing

Breathing is much more than simply getting air into the lungs.

Effective breathing requires coordination between the diaphragm, rib cage, abdominal wall, and pelvic floor. Together, these structures help create and manage pressure throughout the trunk, providing a foundation for both movement and stability.

When the rib cage and pelvis are positioned well relative to one another, the diaphragm is able to function more effectively. One reason for this is a concept known as the Zone of Apposition, which refers to the area where the diaphragm sits against the inner surface of the lower rib cage.

While the details are beyond the scope of this article, the important takeaway is that the position of the rib cage influences the position and function of the diaphragm.

When the rib cage becomes excessively elevated or flared, the diaphragm may lose some of its mechanical advantage. As a result, the body often begins relying more heavily on accessory muscles of respiration, including muscles of the neck, upper chest, and lower back.

This is one reason why individuals who struggle with breathing mechanics frequently report chronic tension through the neck, shoulders, or low back.

A complete exhalation is often one of the simplest ways to improve this relationship. Exhaling fully helps bring the rib cage down and in, allowing the diaphragm to return to a more advantageous position and creating a better starting point for the next inhale.

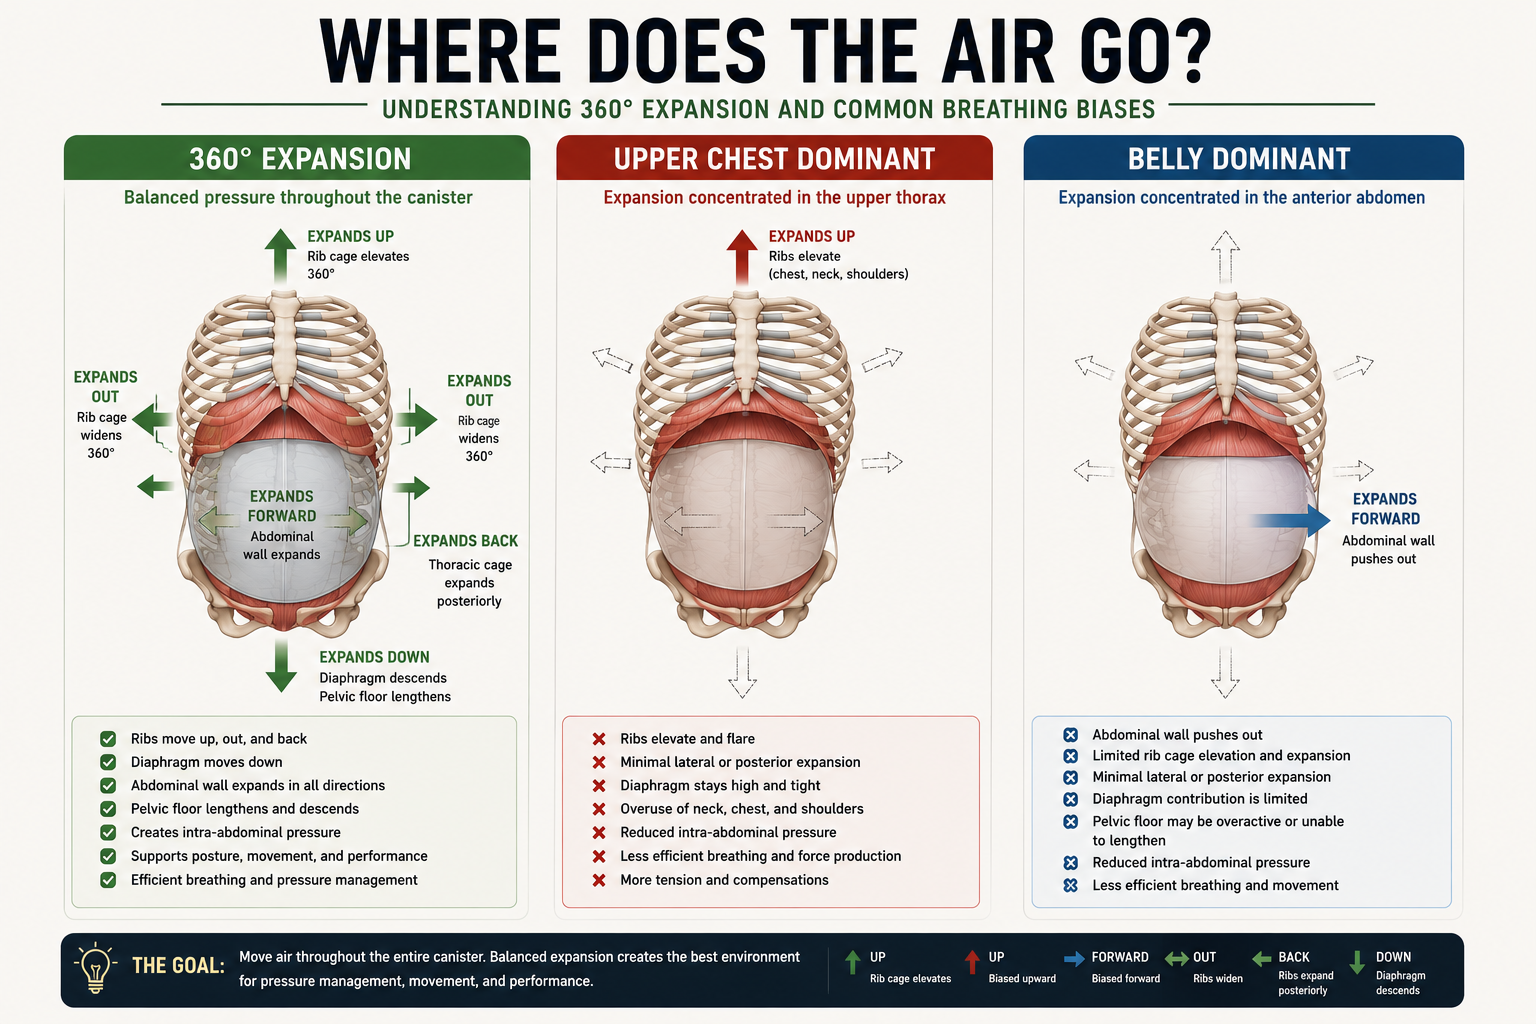
When the stack is present, we should see expansion occur throughout the rib cage and abdominal canister rather than exclusively through the chest, shoulders, neck, or belly.

This includes expansion through the front, sides, and back of the rib cage, as well as coordinated movement of the diaphragm and pelvic floor. This is often referred to as 360-degree expansion.

Diagram comparing 360-degree breathing expansion with upper chest dominant and belly dominant breathing patterns and their effects on pressure management

The rib cage itself is designed to move in multiple directions during respiration. As we inhale, the ribs expand and rotate to accommodate incoming air. As we exhale, they return toward a more neutral position. These movements help distribute pressure throughout the system and allow breathing to support movement rather than interfere with it.

When the stack is lost, these expansion patterns can become biased toward a particular region. Some individuals become upper-chest dominant, relying heavily on the neck and shoulders to breathe. Others primarily expand through the front of the abdomen while gaining little expansion through the sides and back of the rib cage.

Our goal is not simply to breathe into the chest or the belly. Our goal is to create balanced expansion throughout the entire canister, allowing the body to efficiently manage pressure, move well, and perform at its best.

How the Stack Affects Mobility

One of the most common misconceptions in fitness is that mobility limitations are always the result of tight muscles.

While tissue restrictions can certainly exist, many mobility limitations are influenced by joint positioning and pressure management.

The body is often reluctant to access movement that it cannot control.

When the rib cage and pelvis are poorly positioned relative to one another, the body may lose access to certain movement options.

This can influence hip internal rotation, thoracic rotation, shoulder motion, and other ranges of motion throughout the body.

As a result, an individual may feel stiff or restricted despite spending significant amounts of time stretching.

In some cases, restoring a better stack can immediately improve movement quality without any traditional stretching at all.

This doesn't mean stretching is unnecessary. Rather, it highlights the importance of addressing the underlying positional and pressure-management strategies that influence movement.

At Avos Strength, we frequently assess movement both before and after breathing and positional interventions. It is not uncommon to see meaningful changes in mobility once the body is placed in a position that allows it to better manage pressure.

How the Stack Affects Strength and Performance

Strength is ultimately the ability to produce and transfer force.

The stack plays an important role in both.

When the rib cage and pelvis are positioned effectively, the body is often better able to transfer force between the upper and lower extremities.

This can influence performance in squatting, deadlifting, pressing, carrying, sprinting, jumping, and change-of-direction activities.

The stack also influences the body's center of mass.

An individual's ability to shift, rotate, accelerate, and decelerate depends in part on where their mass is positioned and how effectively they can manage it.

When the body relies heavily on compensatory strategies, force production may become less efficient and movement options may become more limited.

This is one reason why we frequently revisit the stack during both rehabilitation and performance-focused training.

How We Help Clients Find Their Stack

For most clients, learning the stack begins with breathing.

One of the simplest ways to improve the relationship between the rib cage and pelvis is through a full exhalation. By fully exhaling, the ribs are able to move down and in, allowing the diaphragm, abdominal wall, and pelvic floor to work together more effectively.

If you'd like to try this yourself, watch our short video demonstrating how to find a stacked position from standing.

For some individuals, finding this position can be challenging while standing. In these situations, positional drills may be useful. Exercises such as a 90-90 Hip Lift can help reduce the influence of gravity and provide the body with a simpler environment in which to learn how to manage pressure and find a stacked position.

From there, we gradually integrate these concepts into movement.

This may involve developing awareness of rib cage position, pelvic position, foot pressure, breathing mechanics, and how these factors influence movement quality.

The appropriate strategy depends on the individual.

Our goal is not to force every client into the same posture. Rather, we aim to improve their ability to manage pressure, access movement options, and move efficiently.

As clients become more aware of these relationships, they often develop a greater understanding of how breathing, mobility, strength, and movement quality are interconnected.

Final Thoughts

The stack is not a magic position.

Nor is it a position that we aim to maintain at all times.

Movement is dynamic. Athletes constantly move through flexion, extension, rotation, and lateral movement depending on the demands of the task in front of them. The goal is not to remain perfectly stacked at all times or to create a rigid posture. Rather, the stack provides a foundation from which movement can occur. When the body can effectively organize the relationship between the rib cage and pelvis, it is often better able to transition into and out of different positions while maintaining efficient breathing, pressure management, and force production.

The stack simply provides a foundation.

It is a position from which the body can effectively manage pressure, breathe efficiently, and access movement options when needed.

When the rib cage and pelvis work together effectively, the body is often able to breathe better, manage pressure more efficiently, access movement options, and transfer force more effectively.

For that reason, the stack remains one of the most important concepts we teach at Avos Strength.

Whether the goal is improved mobility, greater strength, athletic performance, or simply moving and feeling better, the stack provides a foundation upon which all of those qualities can be built.

If you'd like hands-on coaching to find your own stacked position and build it into your training, our 1-on-1 Training sessions start exactly here.

The Limb Arc Model: Why You Should Train the Range of Motion You Actually Own

Written by Evelyn Calado, MKin, CSCS, RKin

If you’ve ever wondered why:

  • Your knees cave in at the bottom of a squat

  • Your low back extends when the weight gets heavy

  • One hip always feels “stuck” at 90°

  • Or mobility drills don’t seem to transfer to strength

…you’re probably running into a concept explained by the Limb Arc Model.

This model, commonly attributed to Bill Hartman, describes how rotational bias changes across ranges of joint flexion — particularly at the hip. And once you understand it, exercise selection becomes dramatically more logical.

Let’s break it down.


What Is the Limb Arc Model?

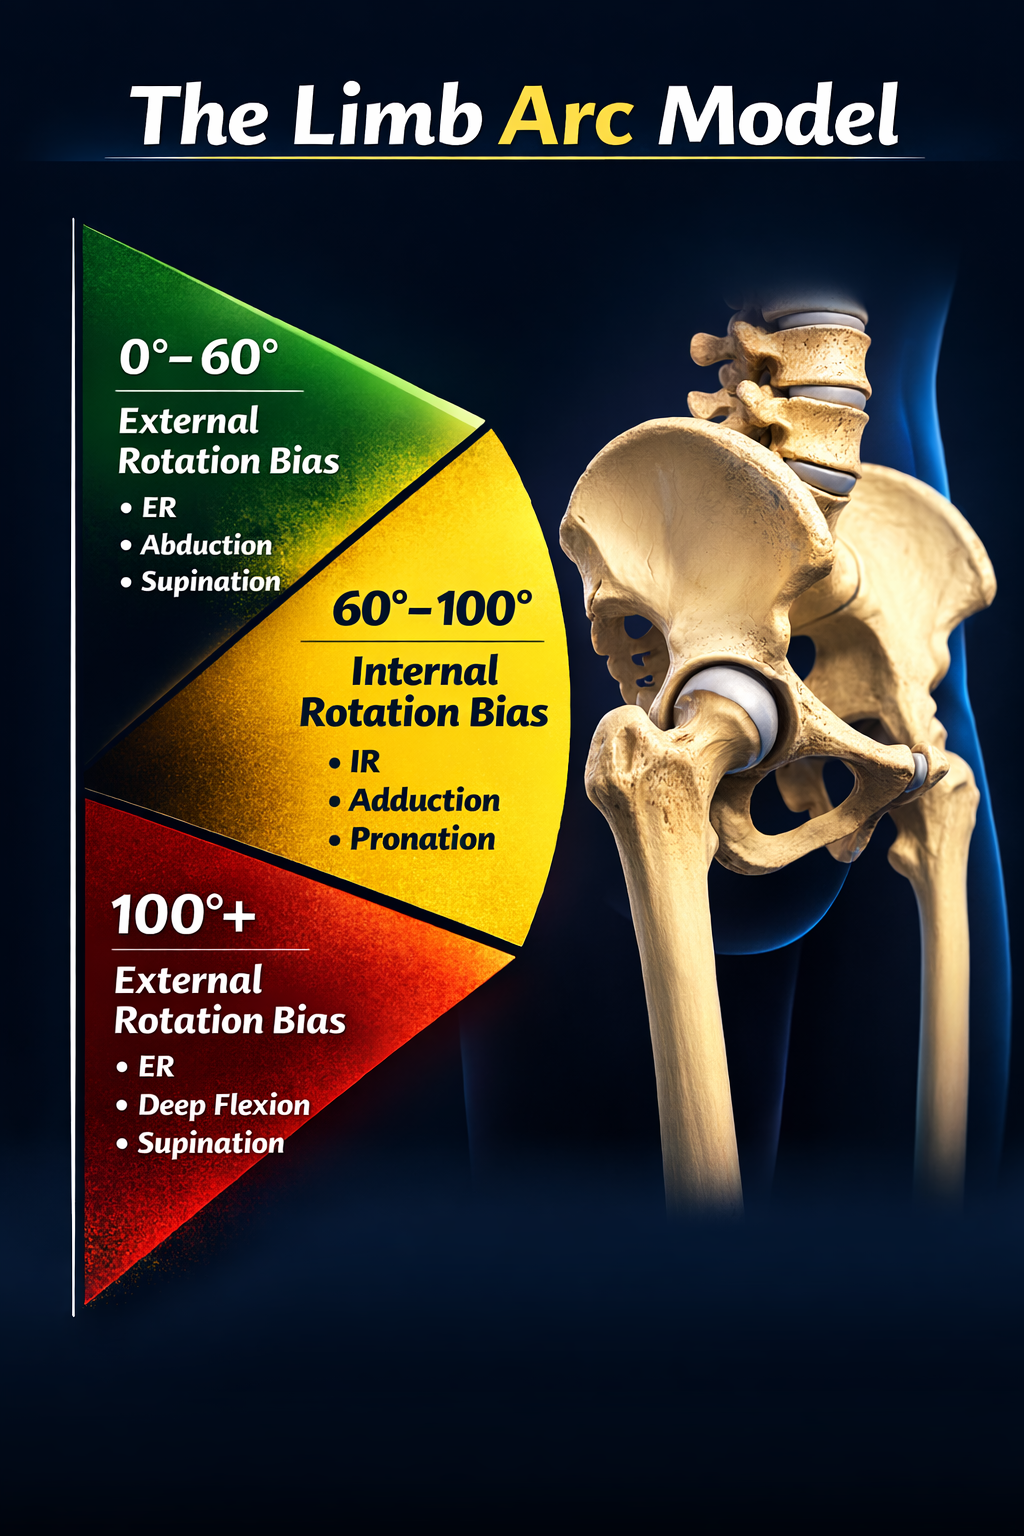
The Limb Arc Model proposes that rotational leverage changes as a joint moves through flexion.

At the hip specifically:

  • Early flexion favors external rotation (ER)

  • Mid-range flexion favors internal rotation (IR)

  • Deep flexion returns to an external rotation bias

This is not arbitrary. It reflects changes in joint geometry, length tension relationships, and moment arms.

Most people train hip flexion as if it is one continuous quality. It is not. It is three mechanically distinct regions.

That shift matters for:

  • Squats

  • Deadlifts

  • Split squats

  • Gait mechanics

  • Sport performance

  • Injury risk

The Hip Flexion Arc Explained

Limb Arc Model diagram by Bill Hartman showing hip rotation bias across ranges of hip flexion

Here’s the simplified breakdown:

0–60° Hip Flexion → External Rotation Bias

In early hip flexion, the joint favors:

  • External rotation

  • Abduction

  • Supination at the foot

  • Sacral counternutation

In gait, this corresponds most closely with early stance, when the heel has contacted the ground and the pelvis is relatively externally rotating as load is being accepted.

In the gym, this is the top portion of a squat or the early phase of a hinge.

External rotators and abductors have favorable leverage here.

60–100° Hip Flexion → Internal Rotation Bias

Around 90° hip flexion:

  • Internal rotators and adductors have improved leverage

  • Length–tension relationships favor IR

  • The piriformis shifts moment arm toward IR

  • The sacrum moves toward nutation

  • The foot transitions toward pronation

In gait, this corresponds most closely with mid stance, when the pelvis is internally rotating on the femur and vertical ground reaction forces are highest.

In a squat, this is typically around parallel.

100°+ Hip Flexion → Returns to External Rotation Bias

As you approach deep hip flexion:

  • The system transitions back toward ER

  • Supination strategies often reappear

  • External rotators regain leverage

This helps explain why some people feel “better” deep in a squat even if they struggle at parallel. They are returning to a range where external rotation leverage increases again.


Why Internal Rotation at 90° Matters

Most loaded bilateral lower-body exercises demand control around 60–100° hip flexion.

If internal rotation is limited in that range, common compensations show up:

  • Knee valgus

  • Lumbar extension

  • Butt wink

  • Hip shifting

  • Over-pronation

  • Gripping with toes

This is not always a strength problem.

It’s often a relative motion problem.

The joint is being asked to produce force in a range it does not control. When the femur is not internally rotating relative to the pelvis, the pelvis, spine, or foot moves instead.


“Train within the Range You Own”

Here’s where this becomes practical.

Owning a range means:

  • You can access it

  • You can control it

  • You can breathe in it

  • You can maintain joint relationships without compensating

If you lack IR at 90°, loading it heavily won’t fix it.

It may:

  • Reinforce compensations

  • Drive orientation strategies (like anterior pelvic tilt)

  • Increase compressive strategies instead of restoring motion

Instead, you might need:

  • Split squats that bias mid-stance

  • Exercises emphasizing medial arch contact

  • Internal rotation control drills

  • Breathing-based repositioning work

  • Heel references to restore early stance mechanics

Force production should follow motion restoration — not precede it. Ie; Restore control first. Then add load.


How This Applies to Programming

The Limb Arc Model gives you a filter for exercise selection.

The question is not whether someone “has internal rotation.”

The question is where in the arc they lose control.

If Control Breaks Down Between 0 and 60 Degrees

You will see:

  • Difficulty accepting load at the top of the squat

  • Poor heel contact

  • Immediate external rotation gripping

  • Early lumbar extension

In this case, reinforce early stance mechanics.

Use closed chain drills that emphasize heel reference and controlled external rotation.
Keep the hip in the zero to sixty degree range and teach load acceptance without extension strategies.

The goal is stable external rotation control in early hip flexion.

If Control Breaks Down Between 60 and 100 Degrees

You will see:

  • Knee valgus at parallel

  • Hip shift at ninety degrees

  • Lumbar extension at the sticking point

  • Loss of medial arch control

This is the most common presentation, and it's exactly what we cover in our post on why your knee caves inward during a squat or lunge.

Here, you bias time spent in sixty to one hundred degrees of hip flexion in closed chain.

Split squat variations are useful when organized correctly because they allow:

  • Pelvis on femur relative motion

  • Clear stance leg reference

  • Control of hip flexion angle

  • Moderate load that does not overwhelm internal rotation capacity

The key is managing support and load so that the pelvis can internally rotate on the femur without defaulting into orientation strategies such as anterior pelvic tilt or lateral shift.

This is not about making someone balance harder.

It is about placing them in the internal rotation biased window and allowing them to control it.

If Control Breaks Down Beyond 100 Degrees

You will see:

  • Instability or collapse in deep squat

  • Over reliance on passive structures

  • Loss of tension in the bottom

In this case, gradually expose the athlete to deeper flexion under controlled conditions, restoring external rotation leverage without compensatory lumbar flexion.


Why This Model Is Powerful

The Limb Arc Model connects:

  • Gait

  • Breathing mechanics

  • Pelvic motion

  • Squat depth

  • Performance

  • Compensation patterns

It explains why:

  • One depth feels strong and another feels unstable

  • Deep squats don’t fix mid-range weakness

  • “Mobility” doesn’t always transfer to strength

Because leverage changes as joint angles change.

And if you don’t own the transition between those zones, the body will compensate.


Final Takeaway

The Limb Arc Model isn’t about stretching more.

It’s about understanding that:

Rotational demands shift as joints move through flexion.

And if you load a range you don’t own, your body will borrow motion from somewhere else.

Train the range you control.

Then expand it.

That’s how you build durable strength.

Learn more about how we assess movement and build individualized programs at Avos Strength.

Rethinking Barefoot Shoes: Why They Might Not Be Right for You

Written by Evelyn Calado, MKin, CSCS, RKin


Barefoot shoes have become a go-to choice for people wanting to “fix” their feet or move more naturally. They’re light, flexible, and promote toe splay—all great things in theory. But when you look at how most of us actually live and move today, barefoot shoes may not be the solution they’re marketed to be.

Barefoot Shoes Were Designed for a Different Environment

These shoes are inspired by the way we used to move: walking on grass, dirt, sand, and other uneven terrain. Environments that challenged the foot to adapt, respond, and build strength.

But that’s not how we move now. Most people walk on flat, hard surfaces—sidewalks, tile, gym floors, concrete. Take away all the structure and cushioning, and you’re now asking your foot to do more work without the natural variability it needs to do it well.

This mismatch often leads to increased strain on the feet, knees, and hips.

Why Feeling the Ground Isn’t Always Enough

A common argument for barefoot shoes is “feel the ground.” But without something to push into, that sensation can become meaningless—or worse, problematic.

Your foot is meant to roll in, absorb force, and push off. When a shoe doesn’t give you any structure to push into, your body can’t organize movement efficiently. That can lead to things like:

  • Flat, collapsed arches

  • Overworking small foot muscles

  • Tight calves and ankles

  • Poor balance and control during walking or training

What’s Good About Barefoot Shoes (And What’s Missing)

To be clear, barefoot shoes do some things well:

  • Wide toe boxes let your toes spread naturally

  • Thin soles improve sensory feedback

  • Zero-drop heels encourage a more upright posture

But on consistently flat, hard ground, these same features can become stressors. They remove too much structure—leaving your body with no support to work with. It’s not that they’re bad, but they aren’t ideal for most people living modern, indoor lives.

What to Look for in a Shoe That Supports You

Instead of going fully minimal, consider footwear that strikes a better balance between freedom and structure. A well-designed shoe should:

✅ Have a Firm Heel

Helps with stability during walking and lifting by anchoring the back of your foot.

✅ Be Flexible at the Toes

Let your big toe extend so you can push off properly during movement.

✅ Offer Moderate Arch Support

Just enough to guide motion—not restrict it. Especially important for those with flat feet or instability.

✅ Include a Slight Heel Drop (4–8 mm)

This small lift can take pressure off the calves and improve overall gait mechanics.

✅ Provide Cushion for Flat Surfaces

Some padding helps absorb repetitive impact from walking and training on hard floors all day.

Note: I’m talking here about everyday shoes—the ones you wear to walk, run errands, train, or do light accessory work. For heavy, bilateral lifts like deadlifts, I’ll still lift barefoot or in minimalist shoes. The shoes I recommend above can be versatile enough to train in, but not ideal for max-effort strength work. It all depends on the context, and at the end of the day what works best for you.

The Bottom Line

Barefoot shoes can be useful—in the right environment, and for the right person. But for most people training, walking, and living on hard, flat surfaces, they often cause more problems than they solve.

A good shoe doesn’t just let you feel the ground—it gives you something to push into. It should support how your body moves and make your life easier, not harder.

Why You Should Rethink How You Row: The Truth About Shoulder Blade Cues

Written by Evelyn Calado, MKin, CSCS, RKin


You’ve probably heard it before:
"Pull your shoulder blades together.”
It’s a cue that’s been passed around gyms and group classes for years.

But here’s the truth: overemphasizing scapular retraction during pulling exercises — like rows and pulldowns — can limit shoulder health, breathing mechanics, and strength development.

If you care about moving better, not just lifting more, it's time to rethink how you row.

1. Over-Retraction Limits Ribcage Expansion

When you cue scapular retraction too forcefully during a row or pulldown, you compress your upper back and limit ribcage movement. This restricts natural thoracic mobility and can impact your ability to breathe and move efficiently under load.

👉 See more on mobility training

2. It Disrupts Scapulohumeral Rhythm

The scapula and humerus are designed to move together in a fluid, coordinated rhythm. Forcing the shoulder blades into retraction first interrupts that sequence. This increases joint stress and decreases the efficiency of your movement — especially in horizontal pulling patterns.

3. You Miss Out on Serratus Activation and Posterior Expansion

When you stop at scapular retraction, you lose out on the benefits of a full reach — which promotes serratus anterior engagement and helps open up the back of the ribcage. This reach improves shoulder function and breathing capacity, particularly for clients struggling with postural restrictions or breathing mechanics.

4. It Reinforces Compensatory Movement Patterns

Cues like "pinch your shoulder blades" often drive people into extension-based strategies — excessive lumbar arching, rib flaring, and overuse of the lats and lower back.

Instead, focus on staying stacked: ribs over pelvis, neutral spine, and movement that flows from a stable foundation.

👉 Learn more about injury prevention strategies

What Proper Row and Pulldown Mechanics Look Like

  • Elbow leads the movement — not the scapula

  • Scapula glides naturally with the arm

  • Reach at the start and end for full range

  • Spine stays neutral, not overextended

  • Breathing stays consistent throughout the set

Better Cues to Use Instead

  • “Elbow to back pocket.”

  • “Let the shoulder blade follow the arm.”

  • “Reach at the end — don’t stop at the shoulder blade.”

  • “Stack your ribs over your hips.”

Want to train smarter?

If you’re tired of outdated cues and want coaching that prioritizes biomechanics, breathing, and real-world strength — we can help.

👉 Explore our Personal Training or Hybrid Coaching Programs

Let’s build strength that lasts.
Contact Us to get started.

Uncovering the Hidden Cause of Scapular Winging: A Comprehensive Approach

Have you ever noticed your shoulder blade sticking out awkwardly? This is called scapular winging. You might have been told that it’s due to a problem with your serratus anterior and that reaching or punching exercises are the key to fixing it.

However, there’s more to the story. Most advice on scapular winging overlooks a critical element that can make all the difference.

The Overlooked Role of the Scapulothoracic Joint

While much attention is given to the muscles surrounding the scapula, the ribcage, which acts as their stage, is often ignored. The scapula is concave, needing a convex surface to move smoothly. This surface is provided by the ribcage.

But what happens when there are restrictions in the ribcage? The ribcage might position itself forward in relation to the scapula, creating the appearance of scapular winging. This isn’t a problem with the scapula itself; rather, the shoulder blade lacks a stable platform to move upon.


The Rotator Cuff’s Dual Function

Commonly, the rotator cuff is thought to solely influence the shoulder joint. Yet, these muscles also play a significant role in moving the scapula. The posterior rotator cuff muscles, specifically the infraspinatus and teres minor, facilitate internal rotation of the scapula. This movement can make the inner border of the scapula lift away from the ribcage, mimicking scapular winging.

When there is insufficient space between the scapula and the thorax, these muscles are forced to multitask, acting on both the humerus and the scapula.

Understanding Ribcage Expansion

The relationship between the thorax and scapula is well-documented. Poor posture, which often limits ribcage expansion, can greatly reduce shoulder mobility. When the ribcage doesn't expand adequately, it restricts scapular movement and places additional stress on the humerus. Therefore, enhancing ribcage expansion is crucial to improving overall shoulder function including scapular winging.

Step by Step Process to Help Improve Ribcage Expansion

To effectively address scapular winging, we must enhance ribcage dynamics through a specific sequence of exercises:

1. Increase Front-to-Back Thoracic Shape (Anterior and Posterior Expansion)

2. Fill the Gap Between the Ribs and Shoulder Blade (Upper Back Expansion)

3. Retrain Scapular Gliding (Chest Expansion and Glenohumeral Mechanics)

Step 1: Front-to-Back Expansion

Enhancing the front-to-back dimension of the ribcage can be achieved through a side-lying position with a foam roller:

Setup: Position a foam roller at the middle third of your ribcage, approximately at chest height. Use a pillow for comfort if necessary to support your head.

Position: Lie on your side with your knees stacked.

Action: Roll forward and slightly sidebend over the foam roller, you can reach forward as shown in the video or reach your top arm toward the ceiling while looking at your hand. You can even hold a dumbbell or kettlebell in an arm bar position while on the roller.

Breathing: Inhale silently through your nose. On the exhale, relax into the foam roller.

Reps: Perform 2-3 sets of five breaths, twice daily for 2-4 weeks

Step 2: Upper Back Expansion

Next, we aim to create space between the ribs and the shoulder blade by driving upper-back expansion: (Rolling drills are great for achieving this)

Setup: Set up depends on the variation, for the first variation, sit on the floor with both feet in front of you.

Position: Hold onto your legs by grabbing behind your knees, keeping your eyes forward.

Action: Inhale and roll backward, then exhale and roll forward, keep a nice rhythmic tempo.

Reps: Do 3 sets of 8-12 rolls (per side), a few times daily for 2-4 weeks.

Step 3: Chest Expansion

To facilitate proper scapular movement, we need to expand the front of the chest. The "pump handle" action of the ribcage can be stimulated using a downward dog position:

Setup: Begin on your hands and knees with hands below shoulders and knees below hips.

Contact Points: Focus on the pisiform (small wrist bone) and the base of the index finger.

Action: Exhale and lift your hips upward while keeping weight on your hand points and looking toward your feet.

Breathing: Inhale silently through your nose. On the exhale, press more heavily through the hand points.

Note: unlike the video you can also pause and breathe in the top position.

Reps: Perform 2-3 sets of five breaths breathing in the hips up position, then do 6-12 reps of the bear to down dog. Perform twice daily for 2-4 weeks.

Conclusion

Scapular winging is not solely a scapular issue. It's a complex interaction between the scapula and the ribcage. Addressing ribcage expansion can provide a stable base for the scapula to glide efficiently, reducing undue stress on the rotator cuff muscles.

By focusing on improving the dynamics of your ribcage, you can create a better environment for your shoulder blade, leading to enhanced mobility and reduced discomfort. Remember, a well-supported scapula is key to healthy shoulder function.