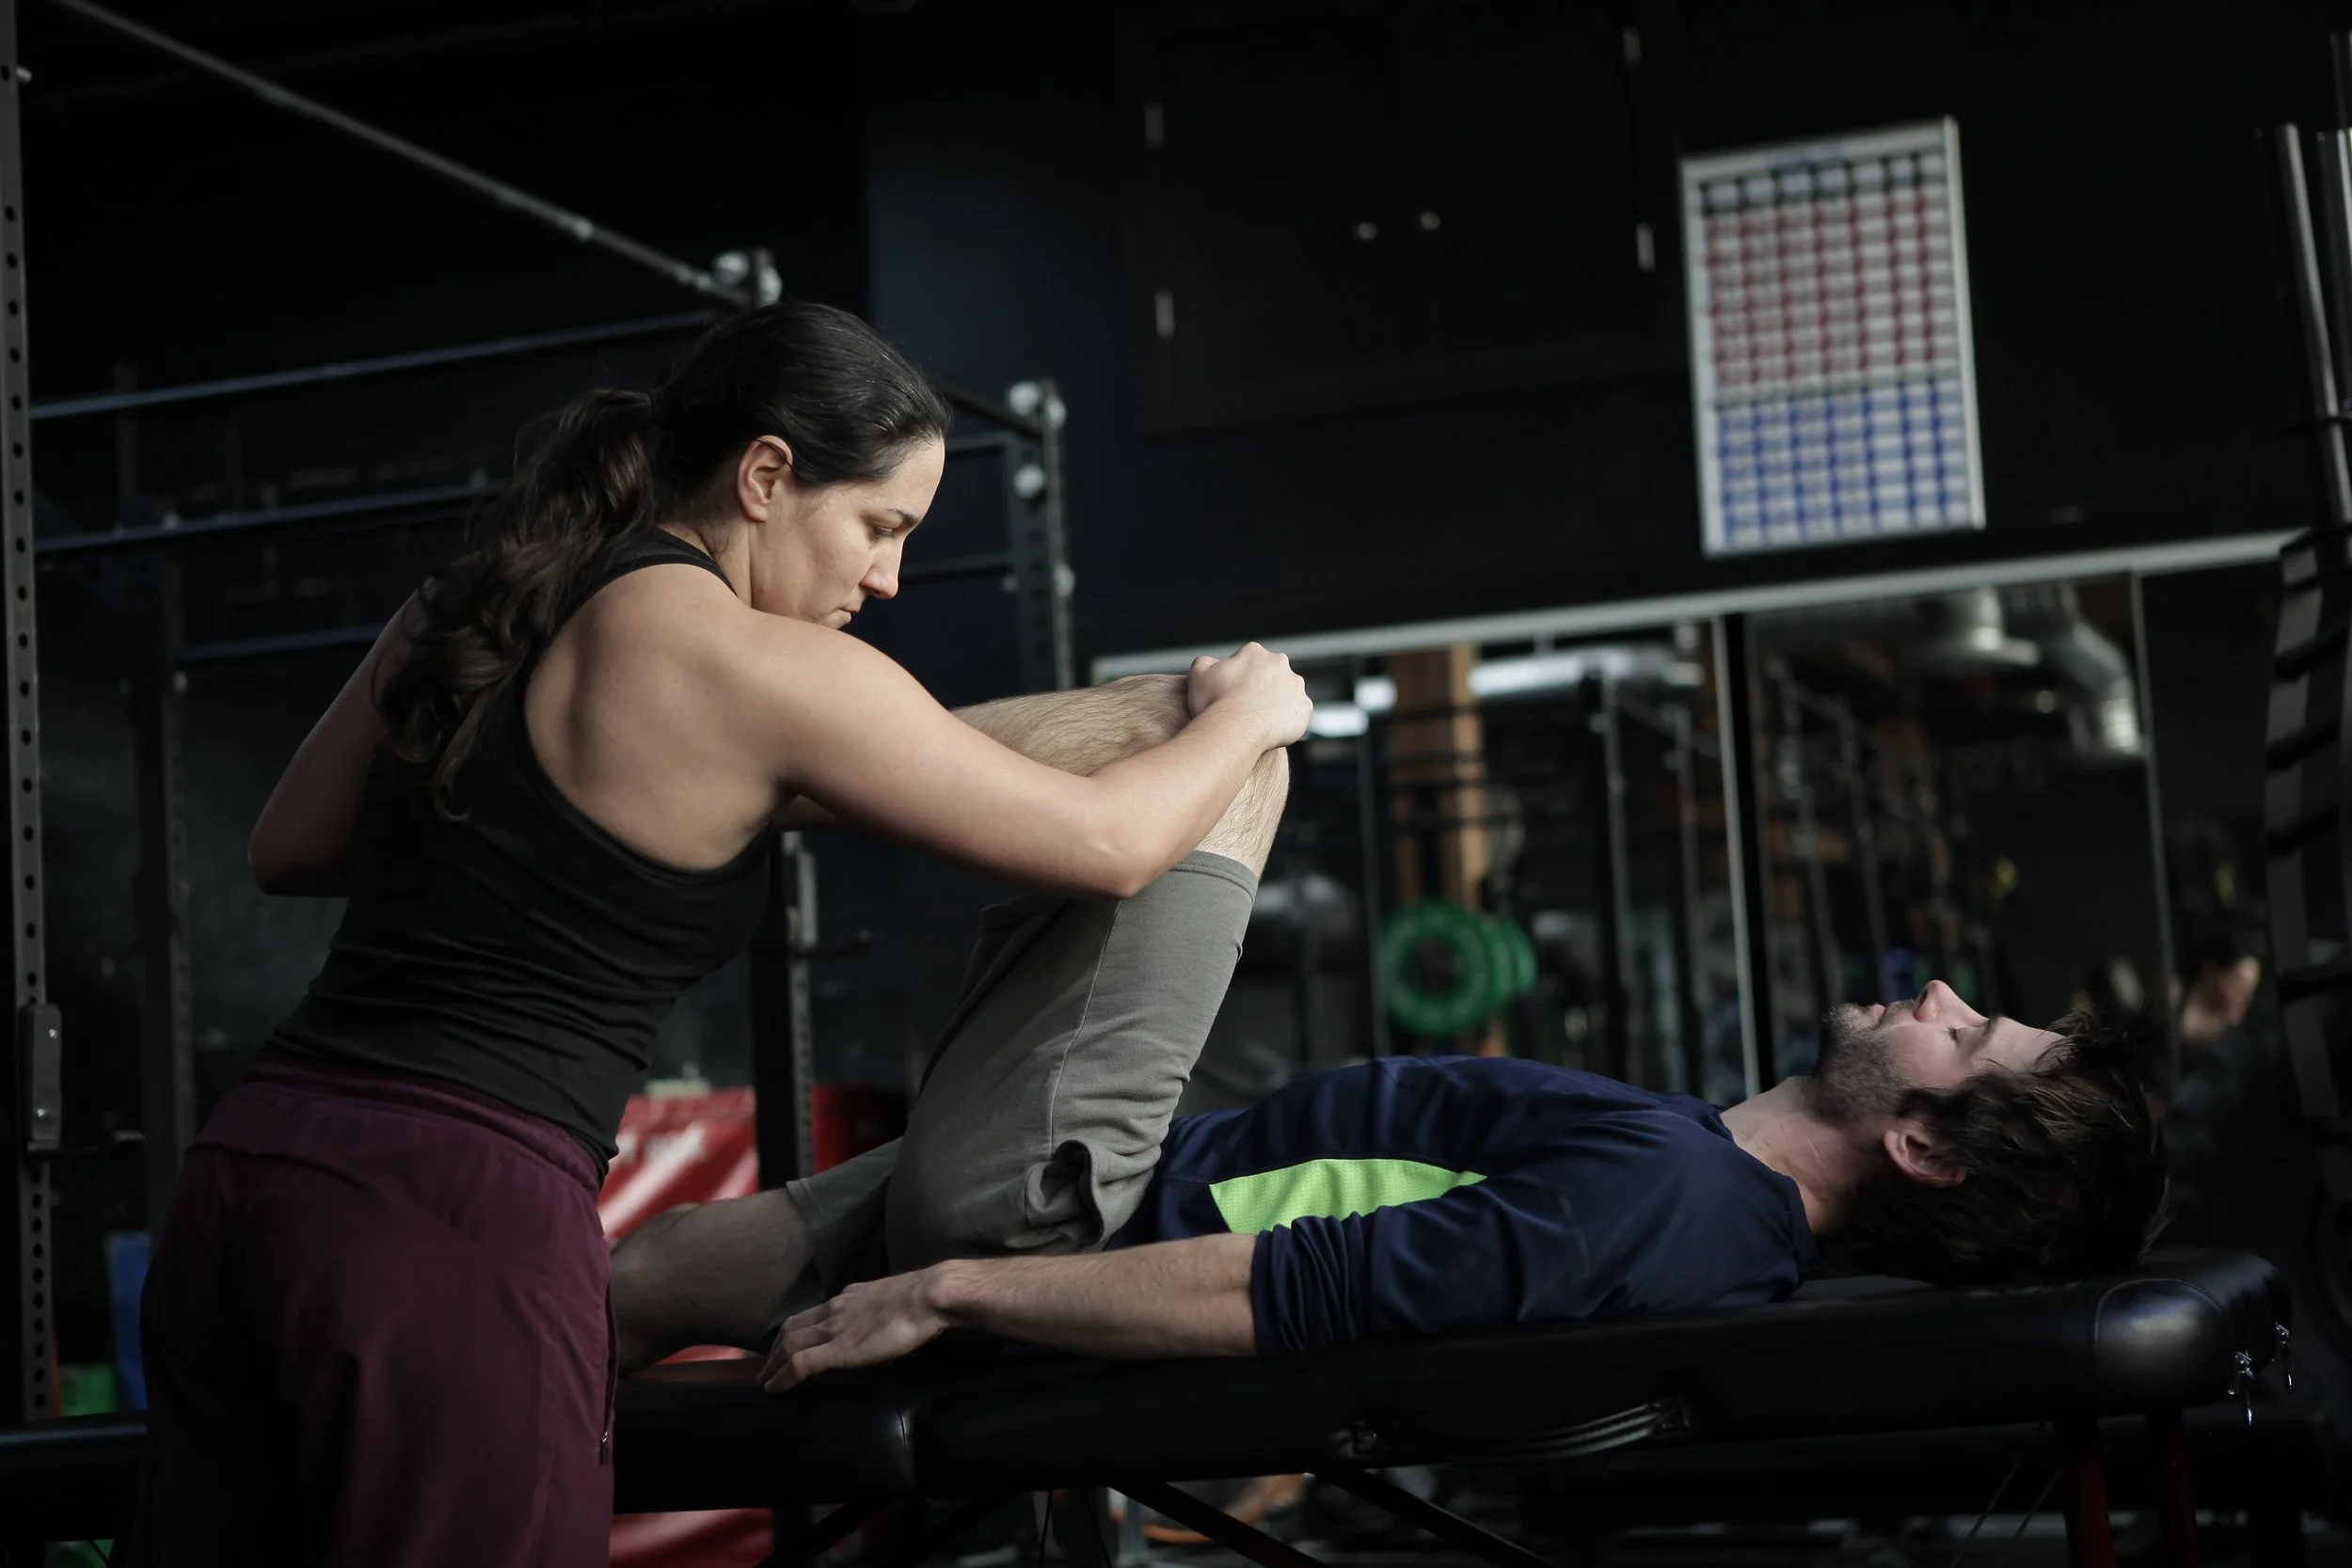
Part 2: Improving Force Production and Movement From Head to Toe
Written by Michael Crawley, BSc, BPT, CSCS
Part 1 of this series looked at how jaw and tongue position influence force output and function. Part 2 turns to the diaphragm and breathing, and how they influence those same systems. As you'll see, good tongue and jaw function and good diaphragm function are closely connected, each affecting the other.
For a healthy individual, the diaphragm works through roughly 18,000 to 30,000 breaths a day. Breathing rate is largely involuntary, generated by the brainstem, but we can also consciously control it for more deliberate tasks.
Learning to influence your breathing can improve athletic performance, reduce some of the risks associated with aging, and support recovery. Before getting into that, here's a quick look at the anatomy involved.
Anatomy
The diaphragm's anatomy is complex, with connection points throughout the body. These connections include the sternum, ribs, and lumbar spine. The diaphragm also has openings that allow passage for major vessels such as the aorta and esophagus, creating a functional link between the thorax above and the abdomen below (Bordoni & Zanier, 2013).
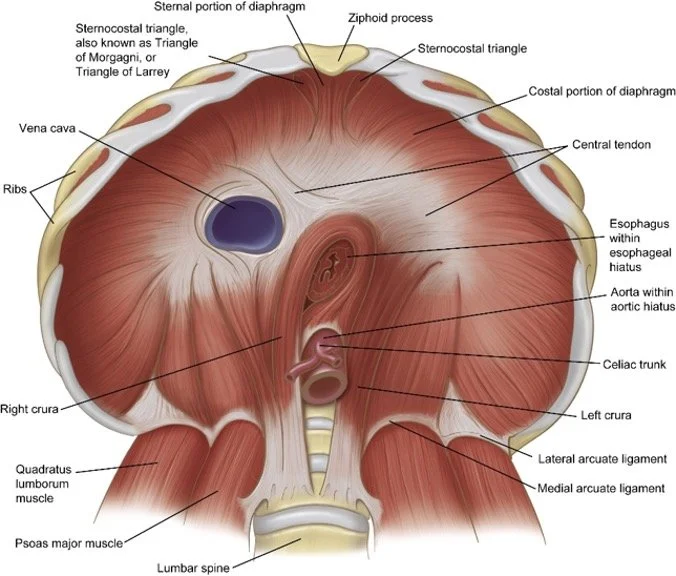
Neural drive to the diaphragm comes from the cervical spine (C3, C4, C5), often remembered with the cue “C3-4-5 keeps the diaphragm alive.” Another key input comes from the vagus nerve, which helps regulate the depth and frequency of diaphragmatic movement, and plays an especially important role in the parasympathetic (“rest and digest”) side of breathing. These details set up the mechanisms discussed below, and help explain how to bias breathing for different outcomes.
Diaphragm, Valsalva, and Force Production
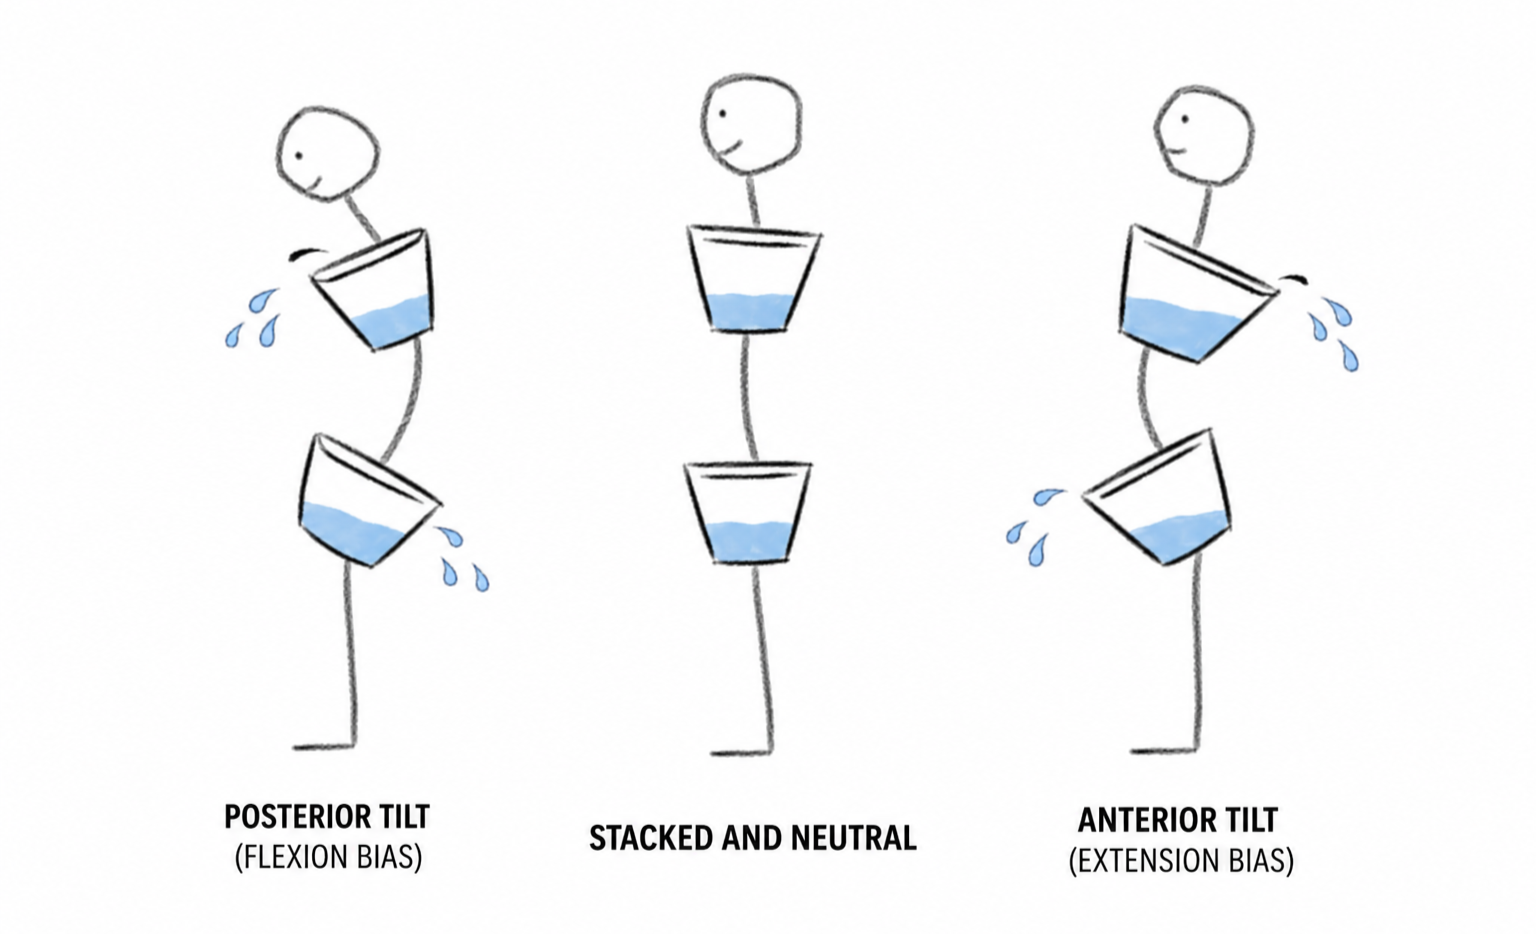
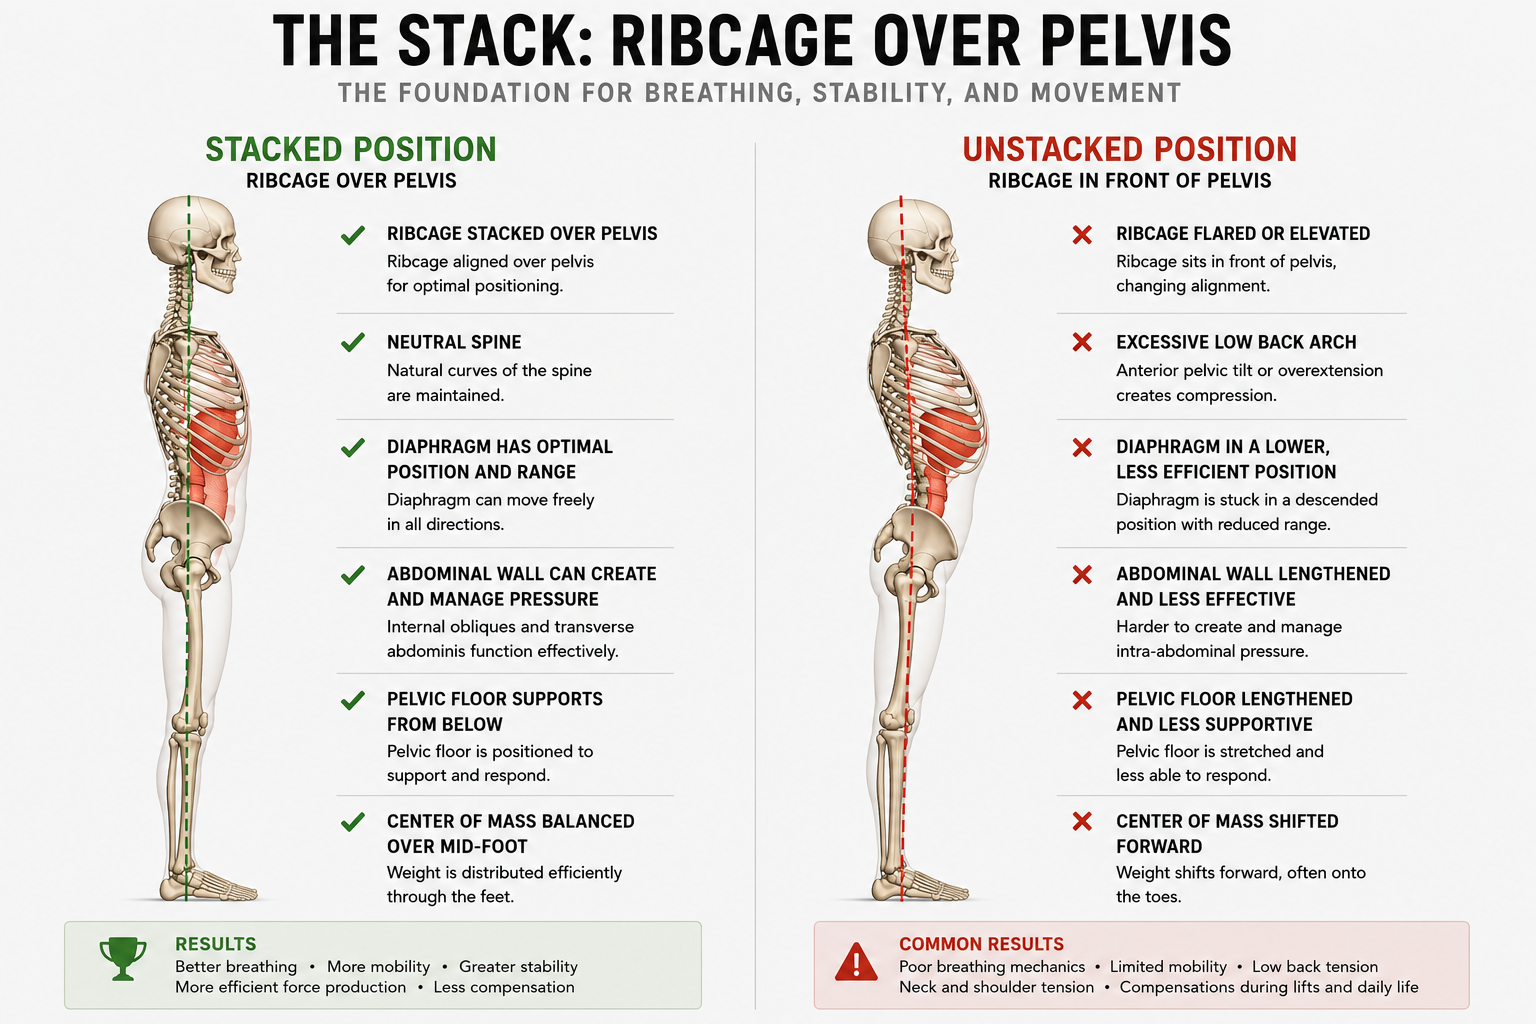
You've probably heard the cue “use your core” in gym and sport settings. It's not a particularly useful instruction, and it often gets misread as crunching the abdominals down and forward. That doesn't support what we call The Stack at Avos Strength, and it doesn't create an efficient system for force production.
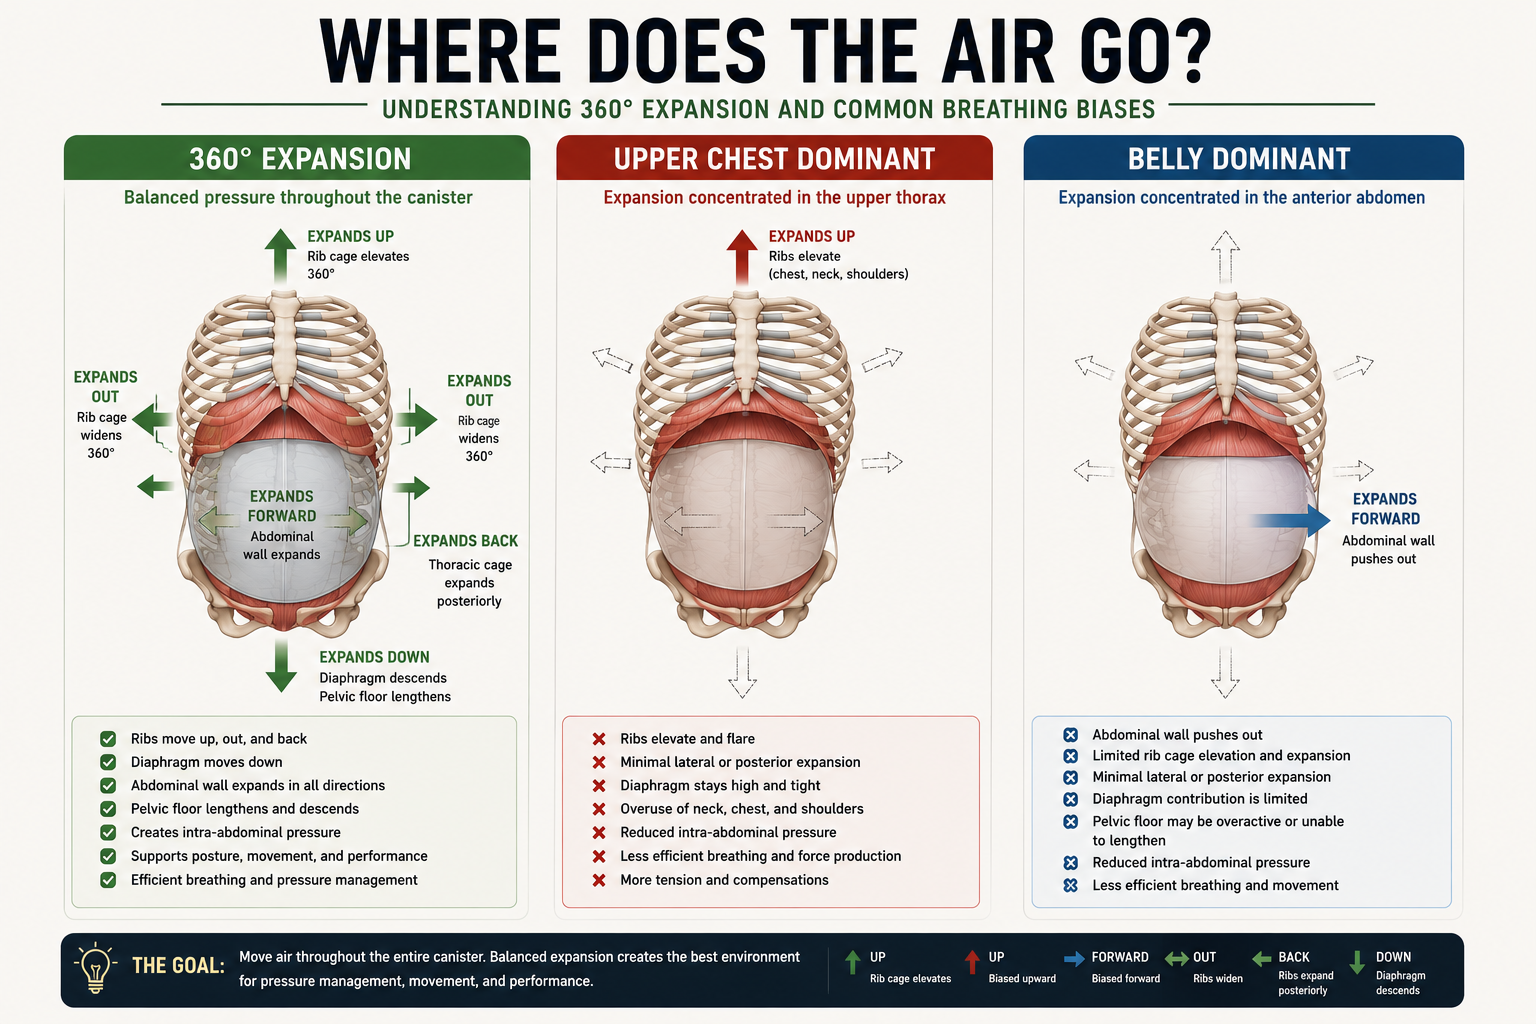
As you inhale and exhale, the diaphragm's movement changes lung volume, which can be used to increase intra-abdominal pressure (IAP). This pressure allows the breath, abdominal muscles, and back muscles to work together, improving spinal stability and force production (Guo et al., 2021).
The Valsalva maneuver (VM) is a forceful exhale against a closed airway. Lifting heavy loads, or lighter loads close to failure, naturally creates a brief VM (Hackett & Chow, 2013). Combined with increased IAP, this is thought to improve spinal stability and allow for more efficient force production.
Disclaimer: Confirm with a healthcare provider that increasing training intensity or intentionally using the Valsalva maneuver is appropriate for you before adding it to your training.
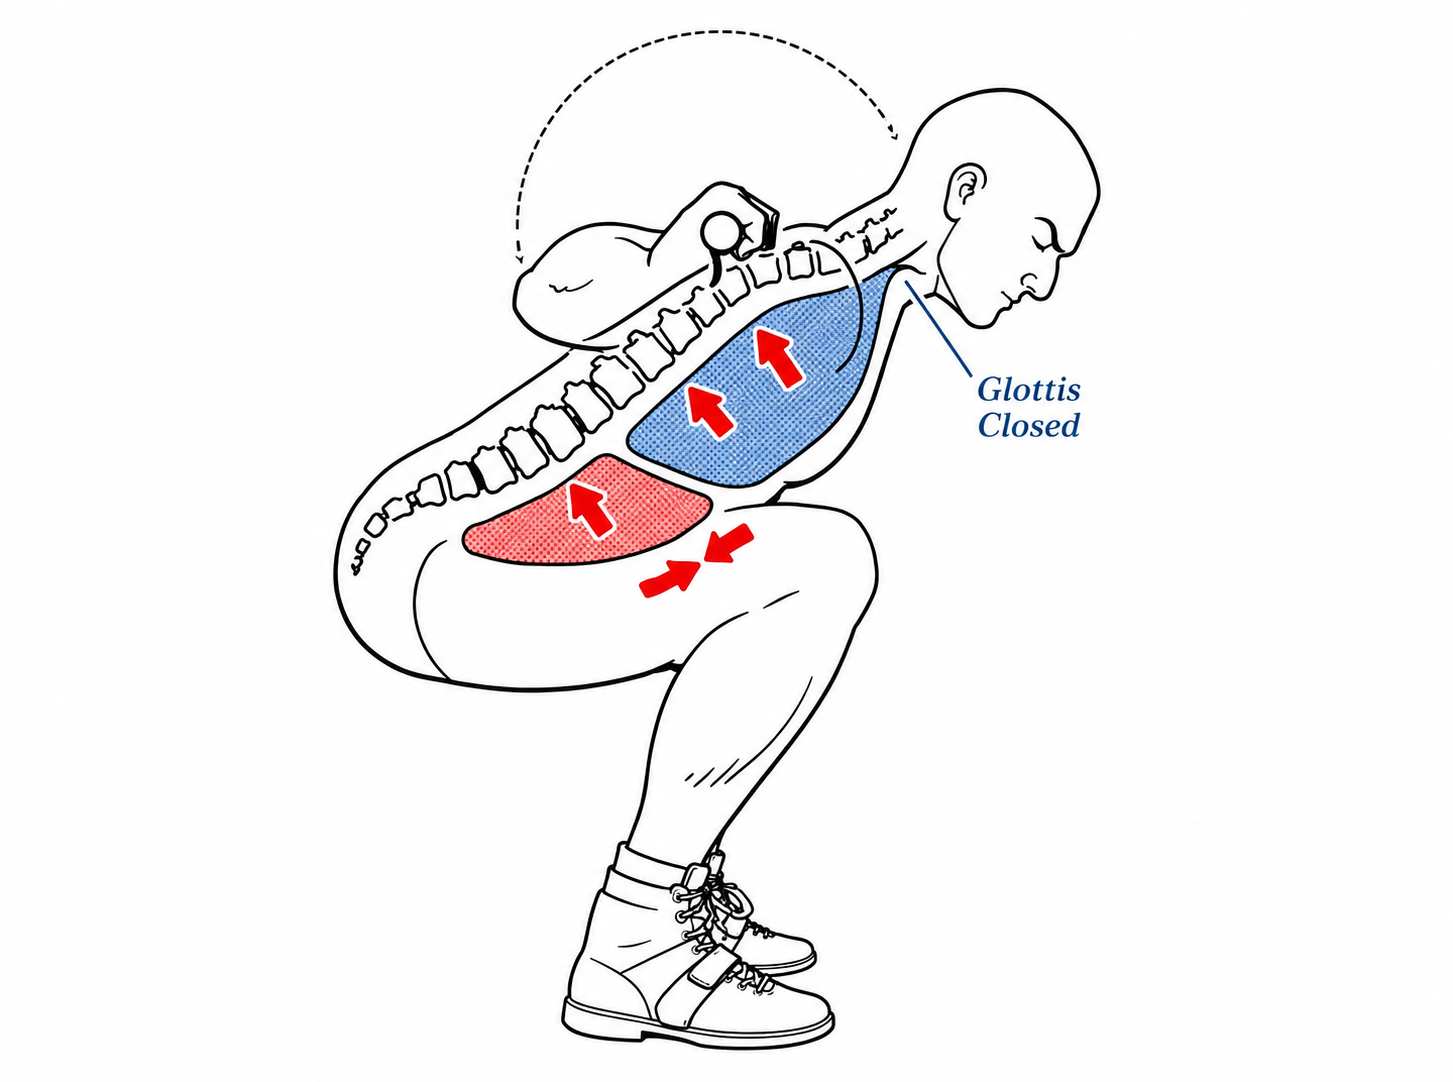
A common strategy is to crunch the abdominals aggressively, which shortens the abdominal muscles and pulls the chest forward. Ironically, this limits the diaphragm's ability to descend and air to enter the thorax. To make this more concrete, here's a simple bracing sequence using the squat as an example:
Standing / prep: A gentle breath in, ideally through the nose.
Standing / prep: A slow, relaxed exhale through the mouth to generate abdominal tension.
Immediately pre-squat: A slight re-inhale to increase pressure against the abdominal wall.
Bottom position: An exhale against a closed mouth or pursed lips if the weight is heavy or fatigue is building.
For a step-by-step walkthrough, see this short video: The Myth of Bracing.
There's nuance here depending on load and volume. For example:
At higher intensity (4 sets of 3 reps at 80% 1RM), you might reset your brace and breath every rep, or every second rep, using step 4 each time.
At higher volume with lower intensity (3 sets of 6 reps at 70% 1RM), you might complete the first 3 to 4 reps without resetting, and without needing a forceful exhale against a closed mouth. Step 4 might only be needed on the last rep or two.
This sequence isn't necessary for every movement. Relaxed, lower-intensity work without a deliberate brace and Valsalva maneuver is a perfectly healthy strategy for exercises such as:
Jefferson curl variations
Spinal flow and rotational work
Lower-intensity isometric work with continuous breathing
Now, from force production to the softer, broader effects of the diaphragm and breathing.
Further Roles and Influence
1. Proprioception, Balance, and Coordination
Proprioception (your sense of position in space), balance, and coordination are constant, everyday requirements, drawing on input from the inner ear, muscles, eyes, and nervous system. As people age, this information tends to travel less quickly and smoothly, which raises the risk of falls and related injuries. Balance exercises, walking on uneven ground, and visual exercises can all help offset that risk.
The diaphragm plays a role here too. Through its relationship with visceral fat, the diaphragm is itself a source of proprioceptive feedback (Bordoni & Zanier, 2013). Nazir et al. (2026) found that diaphragmatic breathing exercises improved balance confidence, reduced fatigue, and improved gait velocity in older adults.
The exercise used to produce that improvement was simple:
Twice a week: 2 rounds of 6 minutes of focused diaphragmatic breathing.
Diaphragmatic breathing: one hand on the chest, one hand on the belly button. Breathe in through the nose for 4 seconds, out through the mouth for 6 seconds.
No equipment, minimal time, and a meaningful reduction in fall risk. That's a good example of how much reach this type of training can have.
2. Restoration and Recovery
Many people are good at the hard side of training: pushing through a tough session, finishing a hard interval workout. Deliberate breathing plays an important role there, as discussed above, but recovery and downregulation matter just as much.
As mentioned in the anatomy section, the vagus nerve supplies the diaphragm and is tied to the rest-and-digest side of the nervous system. Slower, relaxed, mindful breathing after high-intensity activity can help activate the parasympathetic nervous system. Research has linked this to reductions in heart rate and respiration rate, and improvements in heart rate variability (Renaghan et al., 2023). See also Why Your Training Program Won't Work Without Sleep, Nutrition, and Recovery for more on why recovery deserves this kind of attention.
A simple way to introduce this: find a comfortable position (sitting, lying flat, or on your side) and take 10 to 20 relaxed breaths in through the nose and out through the mouth. Beyond supporting recovery, it also bookends the workout, creating a clear separation between the hard and the soft.
These are two of many ways the diaphragm and breathing influence training and daily life. There's a lot of literature on specific breathing styles (box breathing, Buteyko, and others), which can get overwhelming quickly. The simplest entry point is just adding short periods of focused, intentional breathing: relaxed in through the nose, slightly prolonged out through the mouth.
How to Apply This in Training
Resistance training: Don't crunch the abdominals. Use a deliberate inhale-exhale to create stiffness before the movement. If appropriate, incorporate the Valsalva maneuver on higher-intensity efforts or more fatiguing higher-rep sets.
Balance and proprioception: For older adults, add 2 sessions per week of 10 to 15 minutes of deliberate breathing practice to help offset age-related balance and fall risk.
Restoration: Use relaxed breathing in a comfortable position after hard training to support recovery and help the body absorb the training stimulus.
Key Takeaways
The diaphragm supports force production during strength training, largely through its role in generating intra-abdominal pressure.
Deliberate breathing, not aggressive crunching, is what creates a stable, braced trunk.
Diaphragmatic breathing can meaningfully improve balance and reduce fall risk in older adults, with just a few minutes of practice per week.
Slow, relaxed breathing after training helps activate recovery through the parasympathetic nervous system.
Simple, short breathing practices, done consistently, offer an outsized return relative to the effort involved.
Next Up
Moving down the body: the next post in this series will cover foot pressure and foot strength, and how they relate to force production, balance, and longevity, in the gym, in sport, and in everyday life.
References
Bordoni, B., & Zanier, E. (2013). Anatomic connections of the diaphragm: Influence of respiration on the body system. Journal of Multidisciplinary Healthcare, 6, 281–291. https://doi.org/10.2147/JMDH.S45443
Guo, J., et al. (2021). Embodiment of intra-abdominal pressure in a flexible multibody model of the trunk and the spinal unloading effects during static lifting tasks. Biomechanics and Modeling in Mechanobiology, 20(4), 1599–1626. https://doi.org/10.1007/s10237-021-01465-1
Hackett, D. A., & Chow, C.-M. (2013). The Valsalva maneuver: Its effect on intra-abdominal pressure and safety issues during resistance exercise. Journal of Strength and Conditioning Research, 27(8), 2338–2345. https://doi.org/10.1519/JSC.0b013e31827de07d
Nazir, S., et al. (2026). The effect of diaphragmatic breathing and diaphragmatic mobilization on physical performance, fear of falling, and quality of life in community-dwelling older adults: A randomized controlled trial. PLoS ONE, 21(1), e0339868.
Renaghan, E., et al. (2023). The effects of relaxation techniques following acute, high intensity football training on parasympathetic reactivation. Frontiers in Sports and Active Living, 5. https://doi.org/10.3389/fspor.2023.1267631