Movement Tips

What Is the Stack? How Rib Cage and Pelvis Position Affect Movement

Written by Evelyn Calado, MKin, CSCS, RKin

If you've trained at Avos Strength for any length of time, you've probably heard us talk about "the stack."

Whether we're coaching a squat, a deadlift, a breathing drill, a carry, or simply standing posture, the concept comes up repeatedly.

That's because the stack is one of the foundational principles that influences how we breathe, move, stabilize, and produce force.

While it may seem like a small detail, it often has a significant impact on movement quality and performance.


What Is the Stack?

At its simplest, the stack refers to the relationship between the rib cage and the pelvis.

One way to visualize this is to think of both the rib cage and pelvis as buckets of water. When the buckets are stacked on top of one another and remain relatively level, the body is generally in a better position to manage pressure, breathe efficiently, and move well.

When either bucket tips excessively forward or backward, the relationship between the rib cage and pelvis changes. The body may then rely on compensatory strategies to create stability, manage pressure, or access movement.

While no one maintains a perfectly stacked position all the time, this analogy provides a useful framework for understanding why rib cage and pelvic position matter.
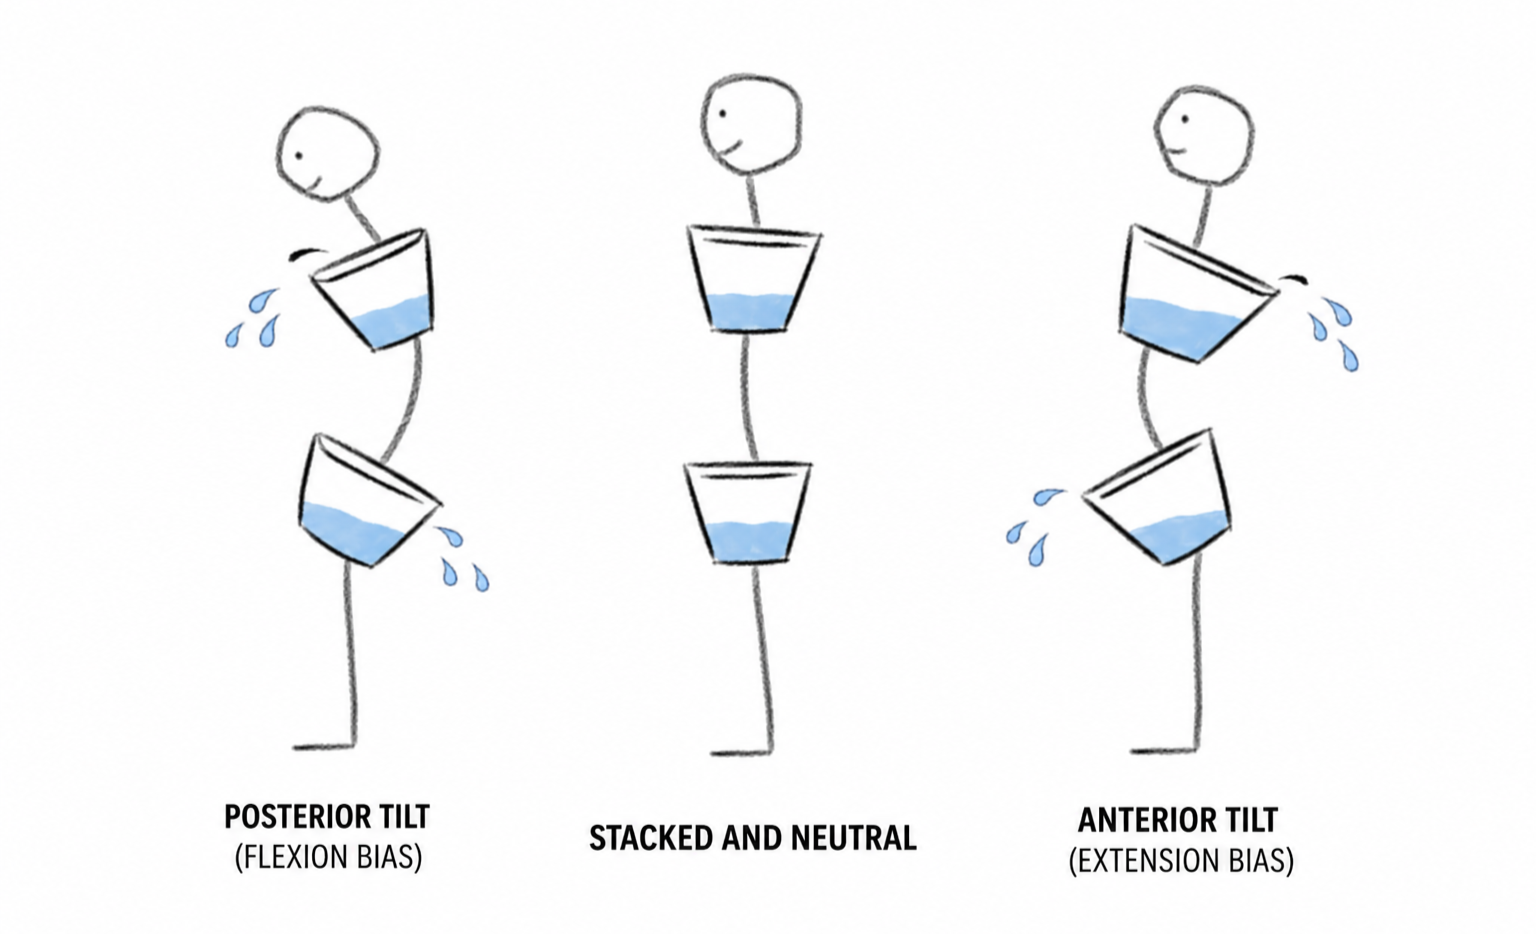
When we talk about being stacked, we're generally referring to the rib cage being positioned over the pelvis.

This doesn't mean flattening the spine, tucking the pelvis excessively, or walking around with your ribs permanently pulled down.

A stacked position still maintains the natural curves of the spine. Instead, it creates an environment where the body can effectively manage pressure, breathe efficiently, and move through available ranges of motion.

From a biomechanical perspective, stacking helps align the thoracic diaphragm and the pelvic floor. These structures form the top and bottom of a pressure system that works together with the abdominal wall to create stability throughout the trunk.

When the rib cage and pelvis are positioned well relative to one another, the body has a stronger foundation from which movement can occur.
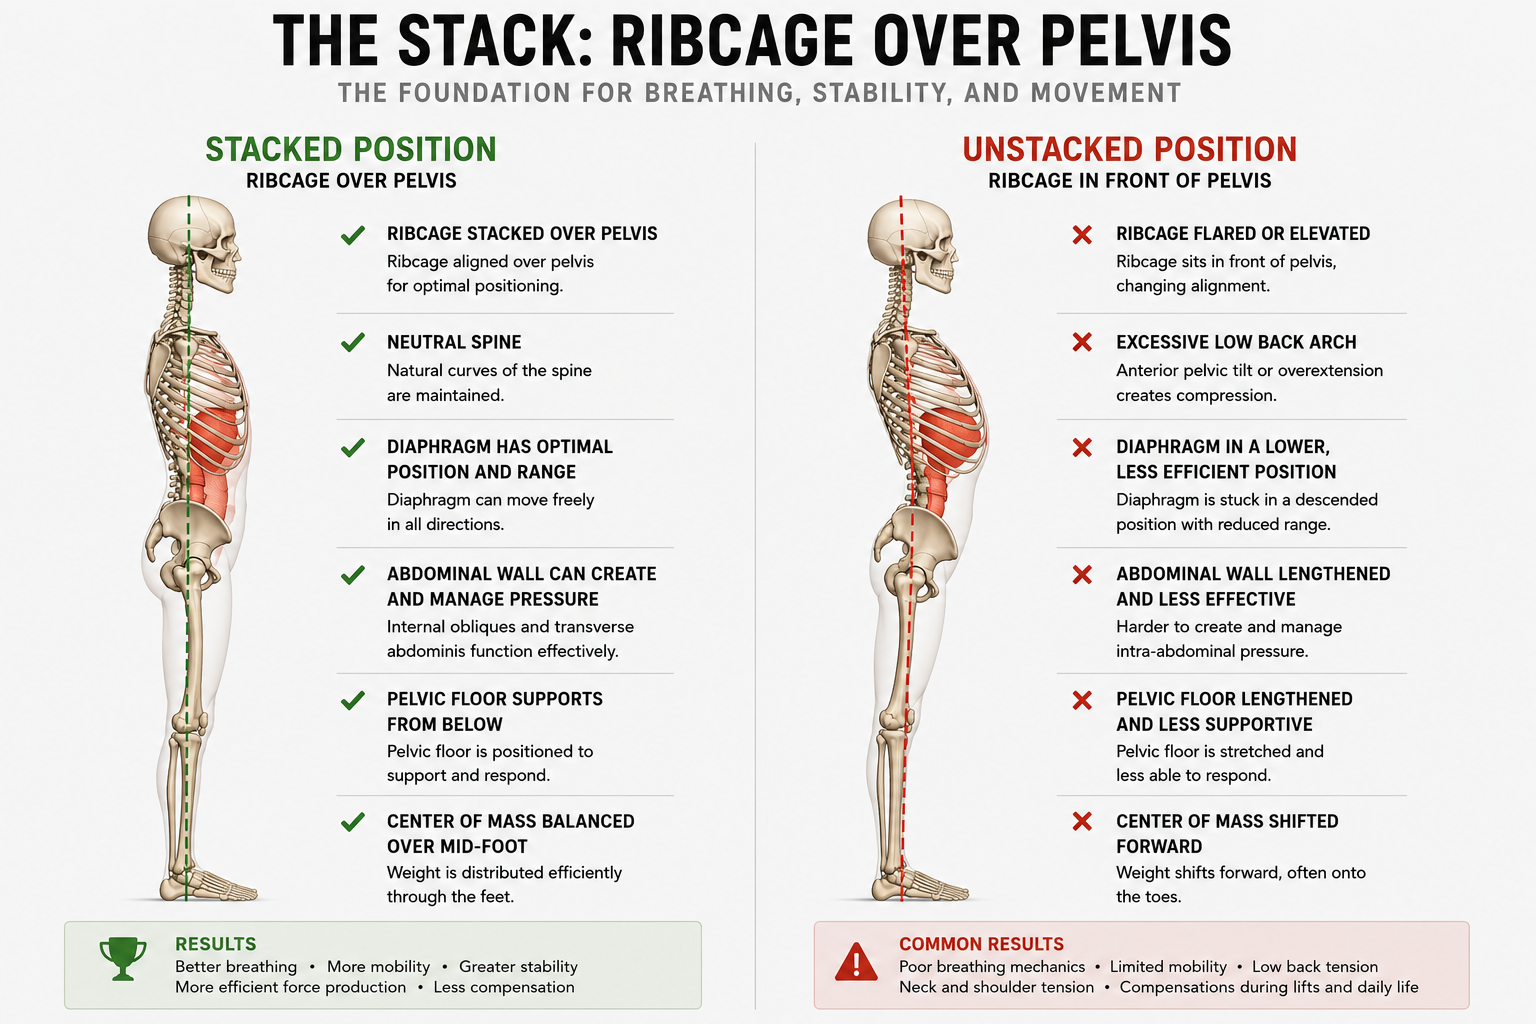
Why We Coach the Stack

Many people think of strength, mobility, and stability as separate qualities.

In reality, they are deeply connected.

One of the primary reasons we coach the stack is because it influences the body's ability to manage pressure.

The diaphragm sits at the top of the abdominal cavity. The pelvic floor sits at the bottom. The internal obliques, transverse abdominis, and other abdominal muscles form the walls of this cylinder.

Together, these structures help regulate intra-abdominal pressure.

This pressure system plays a critical role in spinal stability, force transfer, breathing mechanics, and movement efficiency.

When pressure is managed effectively, the body is often able to access movement options more easily and distribute forces more efficiently.

A useful way to think about this is to imagine an empty aluminum pop can. Despite being made of very thin metal, an undamaged can can support a surprising amount of weight when force is distributed evenly through the structure. The moment the side of the can is dented, however, its ability to manage force drops dramatically.

While the human body is far more complex than a pop can, the analogy illustrates an important principle. When the diaphragm, abdominal wall, pelvic floor, rib cage, and pelvis work together to manage pressure, the trunk becomes remarkably efficient at transferring and resisting force.
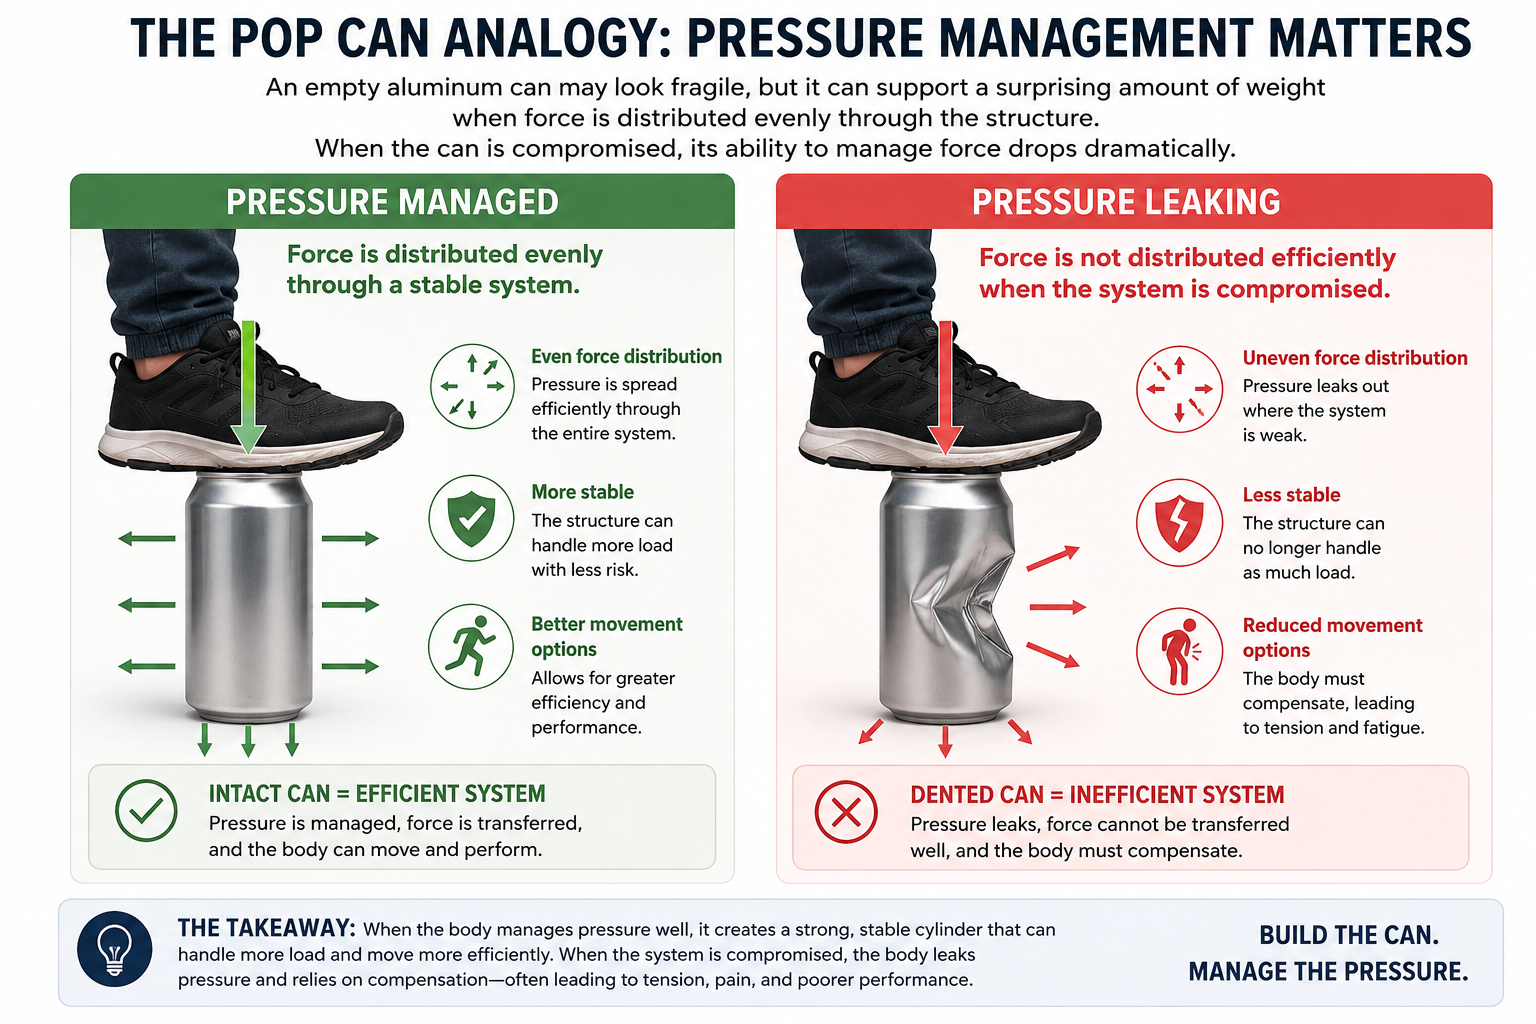
When pressure management is compromised, the body may begin relying on compensatory strategies to create stability and movement.

The stack is not the solution to every problem, but it often provides the foundation that allows other solutions to work.

How the Stack Affects Breathing

Breathing is much more than simply getting air into the lungs.

Effective breathing requires coordination between the diaphragm, rib cage, abdominal wall, and pelvic floor. Together, these structures help create and manage pressure throughout the trunk, providing a foundation for both movement and stability.

When the rib cage and pelvis are positioned well relative to one another, the diaphragm is able to function more effectively. One reason for this is a concept known as the Zone of Apposition, which refers to the area where the diaphragm sits against the inner surface of the lower rib cage.

While the details are beyond the scope of this article, the important takeaway is that the position of the rib cage influences the position and function of the diaphragm.

When the rib cage becomes excessively elevated or flared, the diaphragm may lose some of its mechanical advantage. As a result, the body often begins relying more heavily on accessory muscles of respiration, including muscles of the neck, upper chest, and lower back.

This is one reason why individuals who struggle with breathing mechanics frequently report chronic tension through the neck, shoulders, or low back.

A complete exhalation is often one of the simplest ways to improve this relationship. Exhaling fully helps bring the rib cage down and in, allowing the diaphragm to return to a more advantageous position and creating a better starting point for the next inhale.

When the stack is present, we should see expansion occur throughout the rib cage and abdominal canister rather than exclusively through the chest, shoulders, neck, or belly.

This includes expansion through the front, sides, and back of the rib cage, as well as coordinated movement of the diaphragm and pelvic floor. This is often referred to as 360-degree expansion.
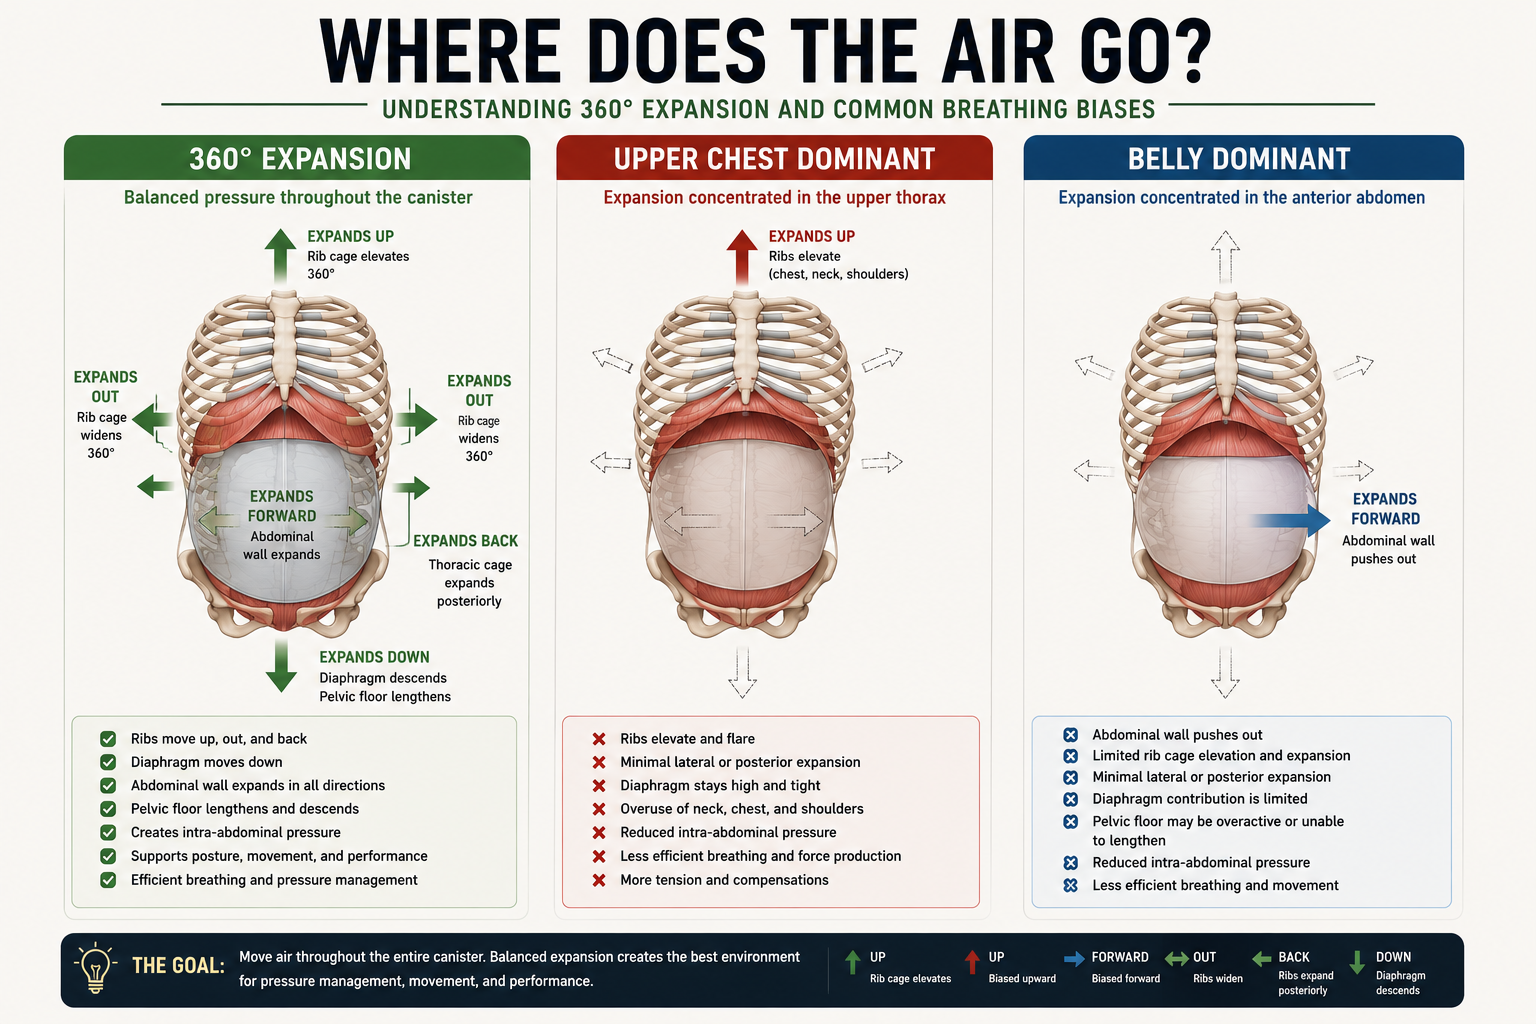
The rib cage itself is designed to move in multiple directions during respiration. As we inhale, the ribs expand and rotate to accommodate incoming air. As we exhale, they return toward a more neutral position. These movements help distribute pressure throughout the system and allow breathing to support movement rather than interfere with it.

When the stack is lost, these expansion patterns can become biased toward a particular region. Some individuals become upper-chest dominant, relying heavily on the neck and shoulders to breathe. Others primarily expand through the front of the abdomen while gaining little expansion through the sides and back of the rib cage.

Our goal is not simply to breathe into the chest or the belly. Our goal is to create balanced expansion throughout the entire canister, allowing the body to efficiently manage pressure, move well, and perform at its best.

How the Stack Affects Mobility

One of the most common misconceptions in fitness is that mobility limitations are always the result of tight muscles.

While tissue restrictions can certainly exist, many mobility limitations are influenced by joint positioning and pressure management.

The body is often reluctant to access movement that it cannot control.

When the rib cage and pelvis are poorly positioned relative to one another, the body may lose access to certain movement options.

This can influence hip internal rotation, thoracic rotation, shoulder motion, and other ranges of motion throughout the body.

As a result, an individual may feel stiff or restricted despite spending significant amounts of time stretching.

In some cases, restoring a better stack can immediately improve movement quality without any traditional stretching at all.

This doesn't mean stretching is unnecessary. Rather, it highlights the importance of addressing the underlying positional and pressure-management strategies that influence movement.

At Avos Strength, we frequently assess movement both before and after breathing and positional interventions. It is not uncommon to see meaningful changes in mobility once the body is placed in a position that allows it to better manage pressure.

How the Stack Affects Strength and Performance

Strength is ultimately the ability to produce and transfer force.

The stack plays an important role in both.

When the rib cage and pelvis are positioned effectively, the body is often better able to transfer force between the upper and lower extremities.

This can influence performance in squatting, deadlifting, pressing, carrying, sprinting, jumping, and change-of-direction activities.

The stack also influences the body's center of mass.

An individual's ability to shift, rotate, accelerate, and decelerate depends in part on where their mass is positioned and how effectively they can manage it.

When the body relies heavily on compensatory strategies, force production may become less efficient and movement options may become more limited.

This is one reason why we frequently revisit the stack during both rehabilitation and performance-focused training.

How We Help Clients Find Their Stack

For most clients, learning the stack begins with breathing.

One of the simplest ways to improve the relationship between the rib cage and pelvis is through a full exhalation. By fully exhaling, the ribs are able to move down and in, allowing the diaphragm, abdominal wall, and pelvic floor to work together more effectively.

If you'd like to try this yourself, watch our short video demonstrating how to find a stacked position from standing.

For some individuals, finding this position can be challenging while standing. In these situations, positional drills may be useful. Exercises such as a 90-90 Hip Lift can help reduce the influence of gravity and provide the body with a simpler environment in which to learn how to manage pressure and find a stacked position.

From there, we gradually integrate these concepts into movement.

This may involve developing awareness of rib cage position, pelvic position, foot pressure, breathing mechanics, and how these factors influence movement quality.

The appropriate strategy depends on the individual.

Our goal is not to force every client into the same posture. Rather, we aim to improve their ability to manage pressure, access movement options, and move efficiently.

As clients become more aware of these relationships, they often develop a greater understanding of how breathing, mobility, strength, and movement quality are interconnected.

Final Thoughts

The stack is not a magic position.

Nor is it a position that we aim to maintain at all times.

Movement is dynamic. Athletes constantly move through flexion, extension, rotation, and lateral movement depending on the demands of the task in front of them. The goal is not to remain perfectly stacked at all times or to create a rigid posture. Rather, the stack provides a foundation from which movement can occur. When the body can effectively organize the relationship between the rib cage and pelvis, it is often better able to transition into and out of different positions while maintaining efficient breathing, pressure management, and force production.

The stack simply provides a foundation.

It is a position from which the body can effectively manage pressure, breathe efficiently, and access movement options when needed.

When the rib cage and pelvis work together effectively, the body is often able to breathe better, manage pressure more efficiently, access movement options, and transfer force more effectively.

For that reason, the stack remains one of the most important concepts we teach at Avos Strength.

Whether the goal is improved mobility, greater strength, athletic performance, or simply moving and feeling better, the stack provides a foundation upon which all of those qualities can be built.

Why Dorsiflexion Matters in Plyometric Drills

Written by Evelyn Calado, MKin, CSCS, RKin


In plyometric drills—whether it’s bounding, skipping, or pogo hops you’ll often hear the cue:

“Dorsiflex your foot!”

But why does that matter?

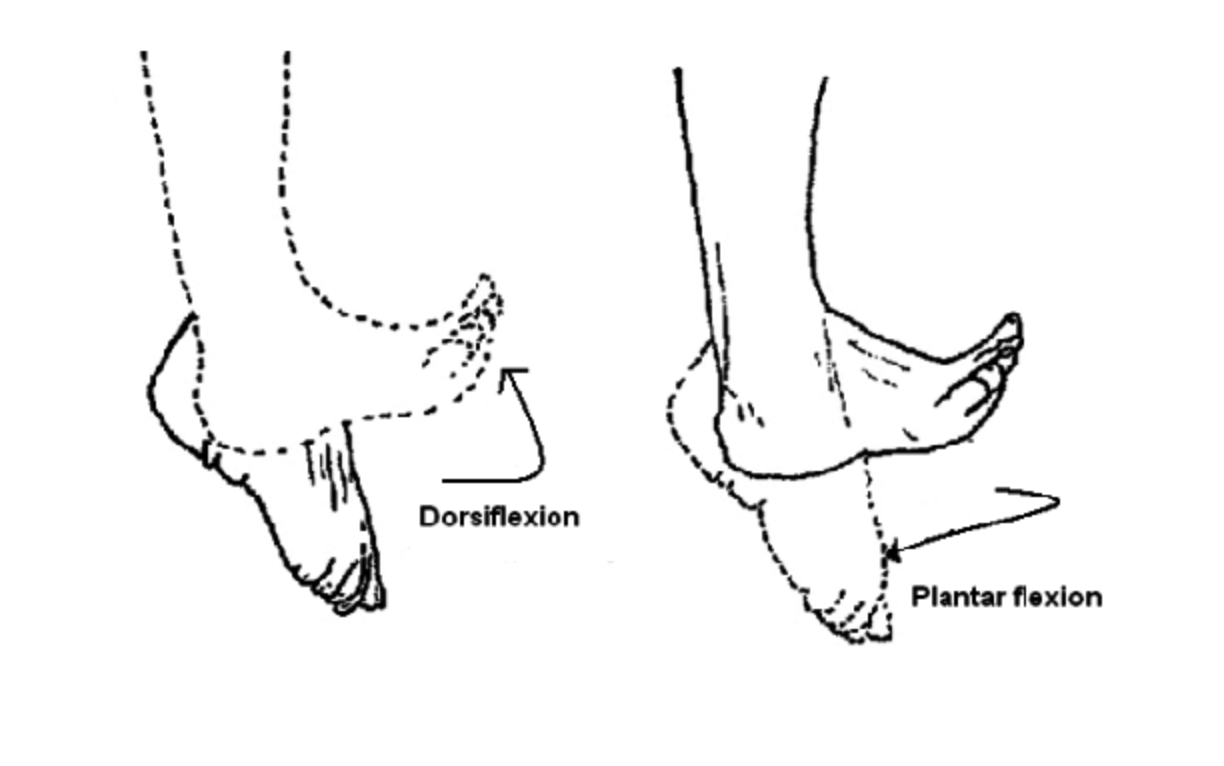
Dorsiflexion (pulling your toes up toward your shin) might seem like a small technical detail, but it has a big impact on performance, coordination, and injury prevention.

You can see in the above video how I dorsiflex my foot (by pulling my toes up) as I’m in the air, before I land again for the next pogo hop.

1. Prepares the Ankle for Stiffness and Quick Rebound

Dorsiflexion creates a rigid lever at the ankle joint, allowing the lower leg and foot to act like a spring. This increases reactive strength—your body’s ability to quickly absorb and release force—which is essential for explosive movements. The result? Shorter ground contact times and a faster, more elastic rebound off the ground.

📚 Weyand et al. (2000) showed that faster sprinters generate higher vertical forces during short ground contact times, a quality supported by stiff ankle positions.
📚 Nagahara et al. (2014) observed that dorsiflexion supports greater horizontal force during sprinting due to increased ankle stiffness.

2. Optimizes Force Transfer

A dorsiflexed foot puts your lower leg in the right position to transmit force efficiently. When your foot is loose or pointed downward (plantarflexed), energy leaks through the ankle, reducing your power output. Dorsiflexing locks the chain in place so every contact helps drive you forward instead of absorbing momentum.

3. Enhances Neural Readiness and Coordination

Dorsiflexion activates key stabilizing muscles like the tibialis anterior, reinforcing good joint alignment and movement mechanics. It trains your body to better coordinate the timing of your stride or jump, improving motor control for athletic skills like sprinting, decelerating, or changing direction. Over time, this improves both performance and efficiency.

📚 Fong et al. (2011) and others note that anterior tibialis activation is essential for controlled foot placement and efficient ground interaction in gait and athletic movement.

4. Encourages Safer Movement Patterns

A dorsiflexed position encourages midfoot or forefoot landings, reducing heel striking and lowering the impact forces on joints like the knees, hips, and lower back. It also places the ankle in a more stable and neutral position, which may reduce stress on the joint and contribute to safer mechanics.

  • Improved dorsiflexion range correlates with better movement quality

    Malloy et al. (2015) found that limited dorsiflexion increases knee valgus angles during landing—a known risk factor for ACL injury.

  • Restricted dorsiflexion is associated with compensations and faulty loading

    Research links poor ankle mobility to increased loading on the knees and altered jumping/landing strategies (Macrum et al., 2012).

  • There’s indirect evidence of injury risk reduction

    While not a guarantee against injury, dorsiflexion encourages mechanics that are commonly associated with reduced strain on the ankle, shin, and knee.

  • Causal proof is still limited

    There are no large-scale RCTs proving dorsiflexion prevents injuries—but its contribution to stable, efficient movement is well established.


Final Takeaway

Dorsiflexion isn’t just about how your foot looks—it’s about how your body moves. It helps you jump higher, land better, and sprint faster while reinforcing movement quality that may help reduce injury risk. In high- speed, high-impact movements, the little things make a big difference.

Train. Play. Repeat.

Curious how small technical tweaks can level up your movement? Book a session at Avos Strength and let’s break it down.

Why You Should Rethink How You Row: The Truth About Shoulder Blade Cues

Written by Evelyn Calado, MKin, CSCS, RKin


You’ve probably heard it before:
"Pull your shoulder blades together.”
It’s a cue that’s been passed around gyms and group classes for years.

But here’s the truth: overemphasizing scapular retraction during pulling exercises — like rows and pulldowns — can limit shoulder health, breathing mechanics, and strength development.

If you care about moving better, not just lifting more, it's time to rethink how you row.

1. Over-Retraction Limits Ribcage Expansion

When you cue scapular retraction too forcefully during a row or pulldown, you compress your upper back and limit ribcage movement. This restricts natural thoracic mobility and can impact your ability to breathe and move efficiently under load.

👉 See more on mobility training

2. It Disrupts Scapulohumeral Rhythm

The scapula and humerus are designed to move together in a fluid, coordinated rhythm. Forcing the shoulder blades into retraction first interrupts that sequence. This increases joint stress and decreases the efficiency of your movement — especially in horizontal pulling patterns.

3. You Miss Out on Serratus Activation and Posterior Expansion

When you stop at scapular retraction, you lose out on the benefits of a full reach — which promotes serratus anterior engagement and helps open up the back of the ribcage. This reach improves shoulder function and breathing capacity, particularly for clients struggling with postural restrictions or breathing mechanics.

4. It Reinforces Compensatory Movement Patterns

Cues like "pinch your shoulder blades" often drive people into extension-based strategies — excessive lumbar arching, rib flaring, and overuse of the lats and lower back.

Instead, focus on staying stacked: ribs over pelvis, neutral spine, and movement that flows from a stable foundation.

👉 Learn more about injury prevention strategies

What Proper Row and Pulldown Mechanics Look Like

  • Elbow leads the movement — not the scapula

  • Scapula glides naturally with the arm

  • Reach at the start and end for full range

  • Spine stays neutral, not overextended

  • Breathing stays consistent throughout the set

Better Cues to Use Instead

  • “Elbow to back pocket.”

  • “Let the shoulder blade follow the arm.”

  • “Reach at the end — don’t stop at the shoulder blade.”

  • “Stack your ribs over your hips.”

Want to train smarter?

If you’re tired of outdated cues and want coaching that prioritizes biomechanics, breathing, and real-world strength — we can help.

👉 Explore our Personal Training or Hybrid Coaching Programs

Let’s build strength that lasts.
Contact Us to get started.

How Do I Get Bigger Arms and Improve Shoulder Mobility?

 Let’s be realistic here, everyone likes training their arms. But what if you could not only increase strength but also shoulder mobility?


When considering the training of these two muscle groups, it's important to understand their respective functions:

  • Biceps are responsible for flexing the arm, contributing to joint actions associated with flexion like external rotation and abduction.

  • Triceps, on the other hand, extend the arm, facilitating joint actions linked to extension such as internal rotation and adduction.


With this knowledge, we can target external rotation and flexion of the shoulder complex by incorporating biceps curls and variations into our routine. Similarly, triceps exercises can help improve internal rotation and arm extension.

Posterior Expansion for External Rotation

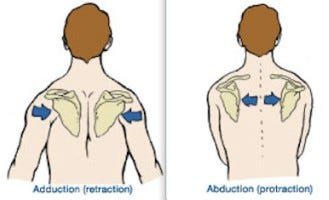
It's worth noting that shoulder external rotation and flexion are influenced by the amount of expansion and the ability to open up the back of you ribcage. Limited range of motion may result from compression or tightness in this area. To address this issue, it's essential to position the scapula (shoulder blades) in a way that allows for movement away from the spine, creating space for decompression. Abduction of the scapula facilitates this movement, as it involves shifting the scapula away from the body's midline.

Note: during ADDUCTION the scapula move toward the midline of the body which compresses this area (those muscles are concentrically oriented). During ABDUCTION the scapula move away from the mid line which allows provides space and therefore expansion in this area.

BICEPS

Curl variations are particularly effective in promoting scapular abduction, as they encourage natural movement of the scapula during elbow flexion, thereby opening and decompressing the upper back.

For instance, performing curls in a deep squat position with cables can enhance this effect. The deep squat necessitates back decompression, which can be further facilitated by using a wedge.  This drill can help open up space to restore shoulder external rotation and flexion.


Another example involves preacher curls with a focus on active rotation:

During the preacher curl, introducing a slight turn to the working side naturally creates space between the scapula and spine in the upper back area (by closing off the front of the chest). This action generates a subtle stretch that can be felt between the spine and scapula, contributing to the decompression of that space and facilitating more opening of the ribcage as you inhale and execute the curl.

Anterior Expansion for Internal Rotation

Shoulder internal rotation and extension are influenced by the amount of expansion and the ability to open up the front of your ribcage. If you are compressed in this area, you will be limited in shoulder internal rotation and extension. There are multiple ways that we can promote expansion to these areas. The first one being gravity. If you imagine a bottle of water that is horizontal, the water will all pool on the bottom of the bottle. Our bodies are analagous to that water, if we put ourselves in a bent over or quadruped position, and our breathe is what can help drive expansion of our ribcage in these positions. Another way is to influence joint positions. Pronation of the forearm leads to Internal rotation of the humerus and External rotation and Adduction of the scapula which helps to promote anterior expansion of the ribcage.

TRICEPS

In this position we are able to use our breath to promote expansion at the front of our chest which can help improve shoulder internal rotation. The bent over posted position also further promotes expansion at the front of our chest.


In this drill the pronated hand helps drive internal rotation at the forearm, scapula adduction and external rotation (concentrically closing off the back) to open up the front of the chest.


I will usually perform 3 sets of 10-12 controlled reps. Breathe in through the nose (this will allow optimal expansion of the ribcage) and exhale with an open mouth on each rep.

So next time you add some arm accessory work to your program, think about how you can best promote some mobility gains in addition to getting an arm pump.

10 Step Approach For When You Get Injured

Often people think that coaches are invincible/super human… but we aren't. You can do everything right: have a solid warmup, good technique etc but sometimes things happen!

Note that this is not medical advice - this is what I find works best for me.


  1. Stop what you're doing

  2. Don't be the hero and assume you can do another set. Trust me, it never goes well.

  3. Book an appointment with your therapist of choice as soon as you can get in.

    1. Everyone has someone, or some type of modality that works best for them.

    2. But remember that these are always temporary solutions.

  4. Assess your current movement abilities and the area of restriction with low level mobility drills.

    1. The first thing that I usually do would be a joint range of motion assessment - something like a cat cow/spinal rotation to see what positions I'm restricted in.

  5. Usually attempting to foam roll or release the area does not work when it's too acute and flared up.

  6. I find the most beneficial thing to do is to actually walk. Make sure that you walk with a good arm swing to allow rotation through the spine.

  7. I will also do some positional breathing drills to drive expansion to the compressed areas.

  8. Try to stay active -When you stop moving is generally when it starts to get worse.

  9. Once it's less acute and/or you've gotten in to see a therapist, I will do some mobility and movement work.

  10. I will gradually progress the intensity and start to add exercises that don't cause pain, increasing the load over time.

    1. Note this may take 1-2+ days or weeks depending on your situation


Be patient and keep moving. There is always something that you can do in the gym. I'm also a big fan of heat: hot baths, hot tub, sauna..


Do what works for you - and hopefully some of these pointers will help you!

Does your Knee Cave Inward When you Squat or Lunge?

How many times have you heard someone say drive your knees out when you squat?

- I know I have said it in the past!

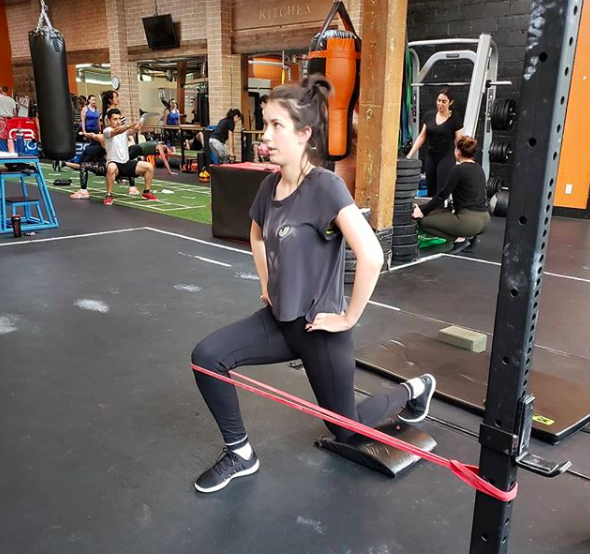
What I used to think, was that you could use a band during a split squat to distract the hip, which in essence forced you to drive the knees out. Now while this is not inherently wrong, it may not always be the best solution depending on the individual. Yes, this band will allow you to recruit the glutes more, as you drive the knee outward putting the hip into external rotation,  BUT, this also prevents the natural movement at the hip in certain ranges of motion.

Screen Shot 2019-07-11 at 12.40.24 PM.png

Using a band to drive more external rotation at the hip

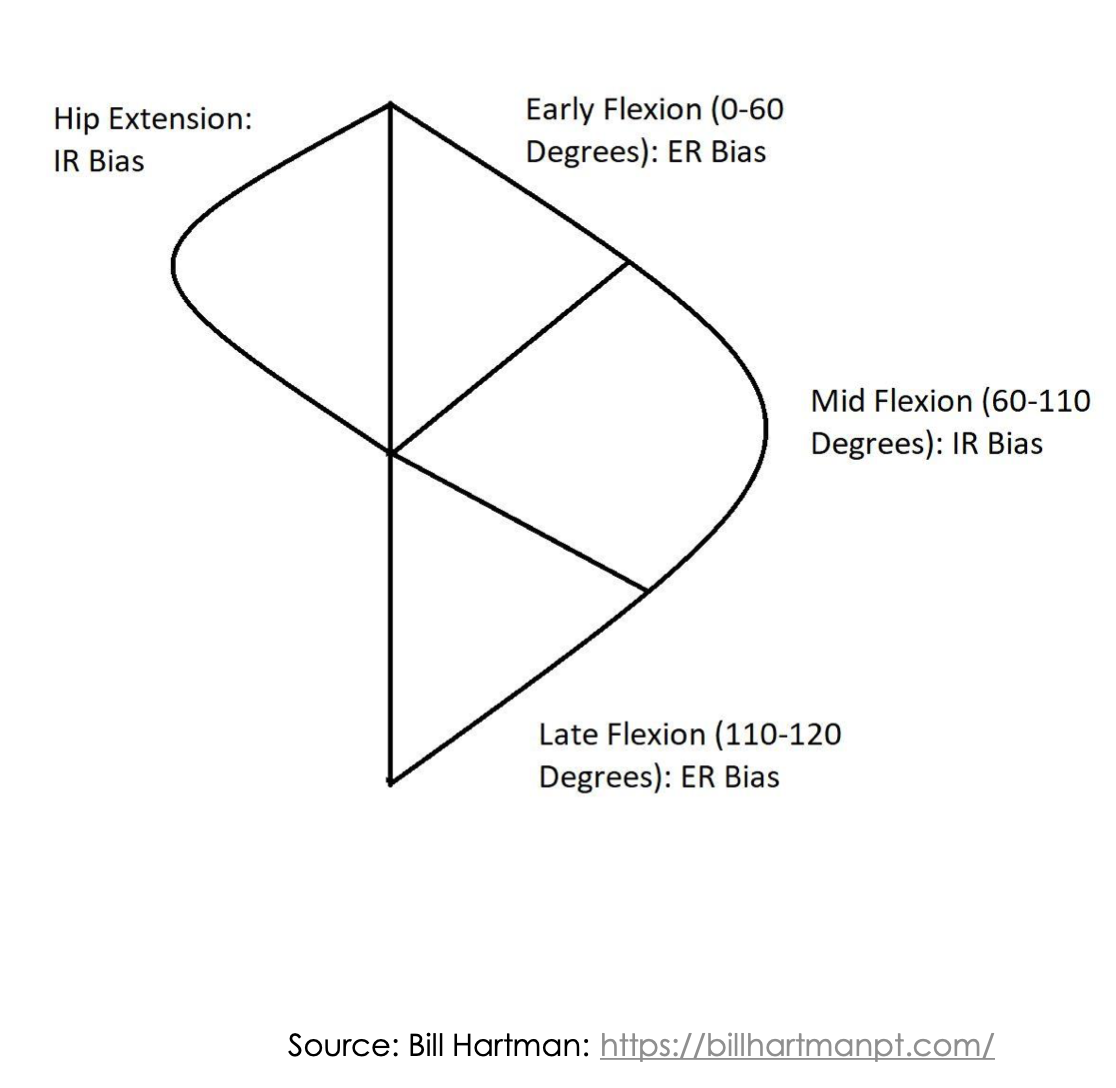
Most sticking points occur at about 90° of hip flexion in a squat. At 90° of hip flexion if we look at a movement limb arc model, the hips requires internal rotation of the femur (or the thighbone). At 60 to 110° of hip flexion, the muscles at the back of your hip that do external rotation actually gain more leverage in internal rotation (i.e. they will lengthen).  In order to get into 90° of hip flexion you need space in order to internally rotate the femur. Therefore, by driving the knees out we are actually reducing the amount of space at the back of the hip because we are creating external rotation (driving the knees out and shortening the muscles that should be lengthened at 90° of hip flexion).  This is why it may not be the most effective cue for some people. 

An exercise that I like to use to help prevent the knee from coming in, is a box step down variation with a band around the knee pulling the knee outward (which forces you to resist that motion by driving the knee inward slightly).

Note: always start with body weight and a lower box before you progress to using load with a higher box.

This is a more ideal way to work on knee control, because based on the limb arc model from 60 to 110deg of hip flexion, it requires internal rotation. Here we are forcing the knee to work by internally rotating. You will get even more glute recruitment in addition to adductors (the inner thighs) because these muscle co-contract or work together when you are in single leg stance.

Contact me today for a custom program to help you move better and get stronger to prevent injuries.