Injury Prevention

Why Dorsiflexion Matters in Plyometric Drills

Written by Evelyn Calado, MKin, CSCS, RKin


In plyometric drills—whether it’s bounding, skipping, or pogo hops you’ll often hear the cue:

“Dorsiflex your foot!”

But why does that matter?

Dorsiflexion (pulling your toes up toward your shin) might seem like a small technical detail, but it has a big impact on performance, coordination, and injury prevention.

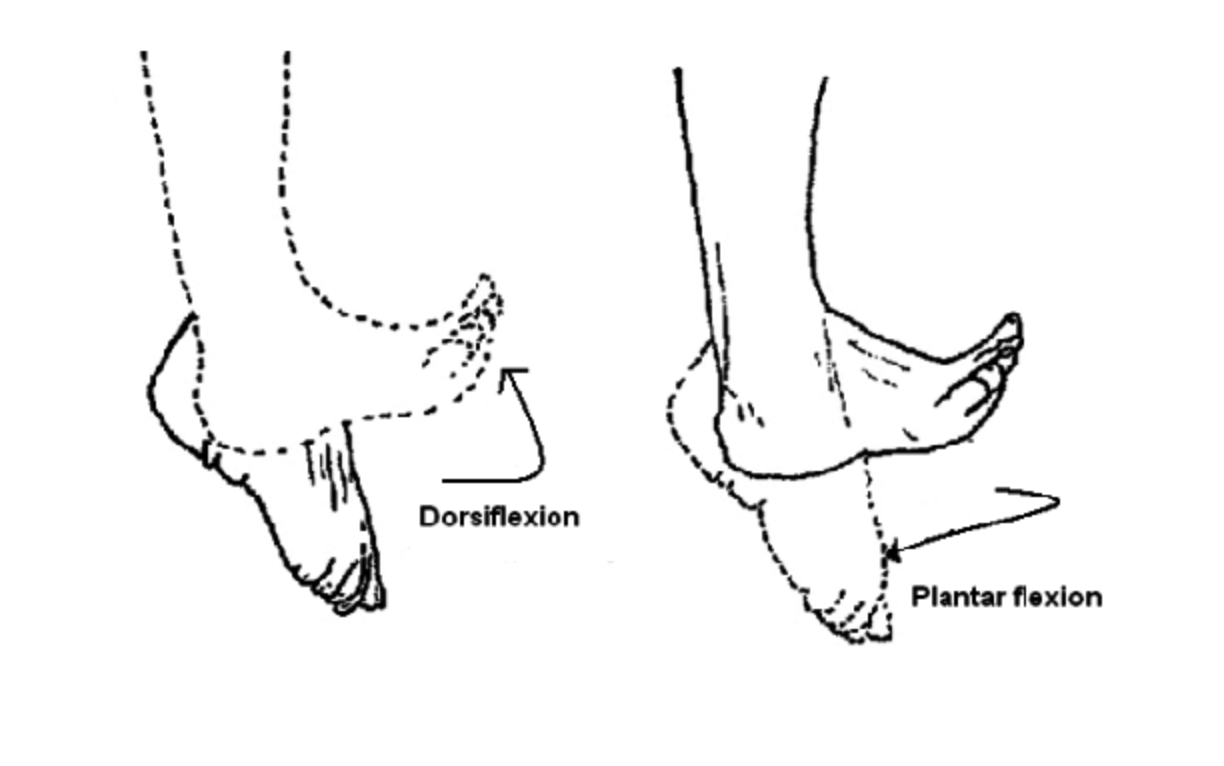
You can see in the above video how I dorsiflex my foot (by pulling my toes up) as I’m in the air, before I land again for the next pogo hop.

1. Prepares the Ankle for Stiffness and Quick Rebound

Dorsiflexion creates a rigid lever at the ankle joint, allowing the lower leg and foot to act like a spring. This increases reactive strength—your body’s ability to quickly absorb and release force—which is essential for explosive movements. The result? Shorter ground contact times and a faster, more elastic rebound off the ground.

📚 Weyand et al. (2000) showed that faster sprinters generate higher vertical forces during short ground contact times, a quality supported by stiff ankle positions.
📚 Nagahara et al. (2014) observed that dorsiflexion supports greater horizontal force during sprinting due to increased ankle stiffness.

2. Optimizes Force Transfer

A dorsiflexed foot puts your lower leg in the right position to transmit force efficiently. When your foot is loose or pointed downward (plantarflexed), energy leaks through the ankle, reducing your power output. Dorsiflexing locks the chain in place so every contact helps drive you forward instead of absorbing momentum.

3. Enhances Neural Readiness and Coordination

Dorsiflexion activates key stabilizing muscles like the tibialis anterior, reinforcing good joint alignment and movement mechanics. It trains your body to better coordinate the timing of your stride or jump, improving motor control for athletic skills like sprinting, decelerating, or changing direction. Over time, this improves both performance and efficiency.

📚 Fong et al. (2011) and others note that anterior tibialis activation is essential for controlled foot placement and efficient ground interaction in gait and athletic movement.

4. Encourages Safer Movement Patterns

A dorsiflexed position encourages midfoot or forefoot landings, reducing heel striking and lowering the impact forces on joints like the knees, hips, and lower back. It also places the ankle in a more stable and neutral position, which may reduce stress on the joint and contribute to safer mechanics.

  • Improved dorsiflexion range correlates with better movement quality

    Malloy et al. (2015) found that limited dorsiflexion increases knee valgus angles during landing—a known risk factor for ACL injury.

  • Restricted dorsiflexion is associated with compensations and faulty loading

    Research links poor ankle mobility to increased loading on the knees and altered jumping/landing strategies (Macrum et al., 2012).

  • There’s indirect evidence of injury risk reduction

    While not a guarantee against injury, dorsiflexion encourages mechanics that are commonly associated with reduced strain on the ankle, shin, and knee.

  • Causal proof is still limited

    There are no large-scale RCTs proving dorsiflexion prevents injuries—but its contribution to stable, efficient movement is well established.


Final Takeaway

Dorsiflexion isn’t just about how your foot looks—it’s about how your body moves. It helps you jump higher, land better, and sprint faster while reinforcing movement quality that may help reduce injury risk. In high- speed, high-impact movements, the little things make a big difference.

Train. Play. Repeat.

Curious how small technical tweaks can level up your movement? Book a session at Avos Strength and let’s break it down.

Rethinking Barefoot Shoes: Why They Might Not Be Right for You

Written by Evelyn Calado, MKin, CSCS, RKin


Barefoot shoes have become a go-to choice for people wanting to “fix” their feet or move more naturally. They’re light, flexible, and promote toe splay—all great things in theory. But when you look at how most of us actually live and move today, barefoot shoes may not be the solution they’re marketed to be.

Barefoot Shoes Were Designed for a Different Environment

These shoes are inspired by the way we used to move: walking on grass, dirt, sand, and other uneven terrain. Environments that challenged the foot to adapt, respond, and build strength.

But that’s not how we move now. Most people walk on flat, hard surfaces—sidewalks, tile, gym floors, concrete. Take away all the structure and cushioning, and you’re now asking your foot to do more work without the natural variability it needs to do it well.

This mismatch often leads to increased strain on the feet, knees, and hips.

Why Feeling the Ground Isn’t Always Enough

A common argument for barefoot shoes is “feel the ground.” But without something to push into, that sensation can become meaningless—or worse, problematic.

Your foot is meant to roll in, absorb force, and push off. When a shoe doesn’t give you any structure to push into, your body can’t organize movement efficiently. That can lead to things like:

  • Flat, collapsed arches

  • Overworking small foot muscles

  • Tight calves and ankles

  • Poor balance and control during walking or training

What’s Good About Barefoot Shoes (And What’s Missing)

To be clear, barefoot shoes do some things well:

  • Wide toe boxes let your toes spread naturally

  • Thin soles improve sensory feedback

  • Zero-drop heels encourage a more upright posture

But on consistently flat, hard ground, these same features can become stressors. They remove too much structure—leaving your body with no support to work with. It’s not that they’re bad, but they aren’t ideal for most people living modern, indoor lives.

What to Look for in a Shoe That Supports You

Instead of going fully minimal, consider footwear that strikes a better balance between freedom and structure. A well-designed shoe should:

✅ Have a Firm Heel

Helps with stability during walking and lifting by anchoring the back of your foot.

✅ Be Flexible at the Toes

Let your big toe extend so you can push off properly during movement.

✅ Offer Moderate Arch Support

Just enough to guide motion—not restrict it. Especially important for those with flat feet or instability.

✅ Include a Slight Heel Drop (4–8 mm)

This small lift can take pressure off the calves and improve overall gait mechanics.

✅ Provide Cushion for Flat Surfaces

Some padding helps absorb repetitive impact from walking and training on hard floors all day.

Note: I’m talking here about everyday shoes—the ones you wear to walk, run errands, train, or do light accessory work. For heavy, bilateral lifts like deadlifts, I’ll still lift barefoot or in minimalist shoes. The shoes I recommend above can be versatile enough to train in, but not ideal for max-effort strength work. It all depends on the context, and at the end of the day what works best for you.

The Bottom Line

Barefoot shoes can be useful—in the right environment, and for the right person. But for most people training, walking, and living on hard, flat surfaces, they often cause more problems than they solve.

A good shoe doesn’t just let you feel the ground—it gives you something to push into. It should support how your body moves and make your life easier, not harder.

Why You Should Rethink How You Row: The Truth About Shoulder Blade Cues

Written by Evelyn Calado, MKin, CSCS, RKin


You’ve probably heard it before:
"Pull your shoulder blades together.”
It’s a cue that’s been passed around gyms and group classes for years.

But here’s the truth: overemphasizing scapular retraction during pulling exercises — like rows and pulldowns — can limit shoulder health, breathing mechanics, and strength development.

If you care about moving better, not just lifting more, it's time to rethink how you row.

1. Over-Retraction Limits Ribcage Expansion

When you cue scapular retraction too forcefully during a row or pulldown, you compress your upper back and limit ribcage movement. This restricts natural thoracic mobility and can impact your ability to breathe and move efficiently under load.

👉 See more on mobility training

2. It Disrupts Scapulohumeral Rhythm

The scapula and humerus are designed to move together in a fluid, coordinated rhythm. Forcing the shoulder blades into retraction first interrupts that sequence. This increases joint stress and decreases the efficiency of your movement — especially in horizontal pulling patterns.

3. You Miss Out on Serratus Activation and Posterior Expansion

When you stop at scapular retraction, you lose out on the benefits of a full reach — which promotes serratus anterior engagement and helps open up the back of the ribcage. This reach improves shoulder function and breathing capacity, particularly for clients struggling with postural restrictions or breathing mechanics.

4. It Reinforces Compensatory Movement Patterns

Cues like "pinch your shoulder blades" often drive people into extension-based strategies — excessive lumbar arching, rib flaring, and overuse of the lats and lower back.

Instead, focus on staying stacked: ribs over pelvis, neutral spine, and movement that flows from a stable foundation.

👉 Learn more about injury prevention strategies

What Proper Row and Pulldown Mechanics Look Like

  • Elbow leads the movement — not the scapula

  • Scapula glides naturally with the arm

  • Reach at the start and end for full range

  • Spine stays neutral, not overextended

  • Breathing stays consistent throughout the set

Better Cues to Use Instead

  • “Elbow to back pocket.”

  • “Let the shoulder blade follow the arm.”

  • “Reach at the end — don’t stop at the shoulder blade.”

  • “Stack your ribs over your hips.”

Want to train smarter?

If you’re tired of outdated cues and want coaching that prioritizes biomechanics, breathing, and real-world strength — we can help.

👉 Explore our Personal Training or Hybrid Coaching Programs

Let’s build strength that lasts.
Contact Us to get started.

Uncovering the Hidden Cause of Scapular Winging: A Comprehensive Approach

Have you ever noticed your shoulder blade sticking out awkwardly? This is called scapular winging. You might have been told that it’s due to a problem with your serratus anterior and that reaching or punching exercises are the key to fixing it.

However, there’s more to the story. Most advice on scapular winging overlooks a critical element that can make all the difference.

The Overlooked Role of the Scapulothoracic Joint

While much attention is given to the muscles surrounding the scapula, the ribcage, which acts as their stage, is often ignored. The scapula is concave, needing a convex surface to move smoothly. This surface is provided by the ribcage.

But what happens when there are restrictions in the ribcage? The ribcage might position itself forward in relation to the scapula, creating the appearance of scapular winging. This isn’t a problem with the scapula itself; rather, the shoulder blade lacks a stable platform to move upon.


The Rotator Cuff’s Dual Function

Commonly, the rotator cuff is thought to solely influence the shoulder joint. Yet, these muscles also play a significant role in moving the scapula. The posterior rotator cuff muscles, specifically the infraspinatus and teres minor, facilitate internal rotation of the scapula. This movement can make the inner border of the scapula lift away from the ribcage, mimicking scapular winging.

When there is insufficient space between the scapula and the thorax, these muscles are forced to multitask, acting on both the humerus and the scapula.

Understanding Ribcage Expansion

The relationship between the thorax and scapula is well-documented. Poor posture, which often limits ribcage expansion, can greatly reduce shoulder mobility. When the ribcage doesn't expand adequately, it restricts scapular movement and places additional stress on the humerus. Therefore, enhancing ribcage expansion is crucial to improving overall shoulder function including scapular winging.

Step by Step Process to Help Improve Ribcage Expansion

To effectively address scapular winging, we must enhance ribcage dynamics through a specific sequence of exercises:

1. Increase Front-to-Back Thoracic Shape (Anterior and Posterior Expansion)

2. Fill the Gap Between the Ribs and Shoulder Blade (Upper Back Expansion)

3. Retrain Scapular Gliding (Chest Expansion and Glenohumeral Mechanics)

Step 1: Front-to-Back Expansion

Enhancing the front-to-back dimension of the ribcage can be achieved through a side-lying position with a foam roller:

Setup: Position a foam roller at the middle third of your ribcage, approximately at chest height. Use a pillow for comfort if necessary to support your head.

Position: Lie on your side with your knees stacked.

Action: Roll forward and slightly sidebend over the foam roller, you can reach forward as shown in the video or reach your top arm toward the ceiling while looking at your hand. You can even hold a dumbbell or kettlebell in an arm bar position while on the roller.

Breathing: Inhale silently through your nose. On the exhale, relax into the foam roller.

Reps: Perform 2-3 sets of five breaths, twice daily for 2-4 weeks

Step 2: Upper Back Expansion

Next, we aim to create space between the ribs and the shoulder blade by driving upper-back expansion: (Rolling drills are great for achieving this)

Setup: Set up depends on the variation, for the first variation, sit on the floor with both feet in front of you.

Position: Hold onto your legs by grabbing behind your knees, keeping your eyes forward.

Action: Inhale and roll backward, then exhale and roll forward, keep a nice rhythmic tempo.

Reps: Do 3 sets of 8-12 rolls (per side), a few times daily for 2-4 weeks.

Step 3: Chest Expansion

To facilitate proper scapular movement, we need to expand the front of the chest. The "pump handle" action of the ribcage can be stimulated using a downward dog position:

Setup: Begin on your hands and knees with hands below shoulders and knees below hips.

Contact Points: Focus on the pisiform (small wrist bone) and the base of the index finger.

Action: Exhale and lift your hips upward while keeping weight on your hand points and looking toward your feet.

Breathing: Inhale silently through your nose. On the exhale, press more heavily through the hand points.

Note: unlike the video you can also pause and breathe in the top position.

Reps: Perform 2-3 sets of five breaths breathing in the hips up position, then do 6-12 reps of the bear to down dog. Perform twice daily for 2-4 weeks.

Conclusion

Scapular winging is not solely a scapular issue. It's a complex interaction between the scapula and the ribcage. Addressing ribcage expansion can provide a stable base for the scapula to glide efficiently, reducing undue stress on the rotator cuff muscles.

By focusing on improving the dynamics of your ribcage, you can create a better environment for your shoulder blade, leading to enhanced mobility and reduced discomfort. Remember, a well-supported scapula is key to healthy shoulder function.

Strength Training For Trail Running

Trail running isn't just a sport; it's a captivating journey through rugged terrain, demanding both physical resilience and mental fortitude. As trail running gains popularity among fitness enthusiasts and adventurers, the importance of strength training in preparing for these exhilarating runs cannot be overstated. Beyond just logging miles on the trail, incorporating strength training into your regimen can be the key to unlocking your full potential as a trail runner.

The Unique Demands of Trail Running

Unlike road running, trail running presents a myriad of challenges. Trails are often uneven, with varying inclines, declines, obstacles, and surfaces. The constant changes in terrain demand exceptional balance, stability, and muscular endurance. Moreover, trail runners must navigate steep ascents and descents, requiring significant lower body strength and power to conquer challenging climbs and maintain control during treacherous descents.

Why Strength Training Matters

Strength training serves as the foundation upon which trail runners build strength, power, and efficiency.

At Avos we are a huge fan of the Trap Bar Deadlift - especially for our tall runners

Here are several reasons why strength training is indispensable for trail runners:

  1. Injury Prevention: Trail running places immense stress on the body, increasing the risk of overuse injuries and muscular imbalances. Strength training helps mitigate these risks by strengthening muscles, tendons, and ligaments, enhancing joint stability, and correcting imbalances. A well-rounded strength training program can address weak areas, reduce the likelihood of injury, and promote longevity in the sport.

  2. Enhanced Performance: Strength training enhances the body's ability to generate power, endure fatigue, and maintain proper form over long distances. Stronger muscles provide the support and propulsion necessary to tackle steep climbs, power through technical terrain, and navigate challenging descents with confidence. By improving strength and efficiency, trail runners can sustain higher speeds, conquer formidable obstacles, and excel in varying distances and difficulties.

  3. Improved Running Economy: Running economy, the measure of how efficiently a runner uses oxygen at a given pace, is crucial for endurance athletes. Strength training contributes to improved running economy by enhancing biomechanical efficiency, optimizing muscle recruitment patterns, and reducing excess energy expenditure. As a result, trail runners can cover greater distances with less effort, allowing for faster race times and improved overall performance.

  4. Mental Resilience: Trail running is as much a mental challenge as it is a physical one. Strength training cultivates mental resilience by instilling discipline, focus, and determination. Moreover, it allows individuals to have the confidence in their strength and conditioning to not have to worry as much about being injured and super fatigued. Being strong in the weight room and pushing yourself helps teach runners to embrace discomfort, overcome obstacles, and persevere in the face of adversity—essential qualities for success in trail racing.

Designing a Strength Training Program:

When writing a strength training program for trail running, it's advisable to include a variety of exercises that target key muscle groups, address weaknesses, and complement running-specific training sessions. Incorporate a diverse mix of bodyweight movements, resistance training, and plyometrics to enhance core stability, lower body strength, balance, and flexibility. Prioritize exercises like squats, lunges, deadlifts, calf raises, planks, and single-leg movements to strengthen muscles used in running and improve stability on uneven terrain. Ensure that your program progressively challenges your muscles while allowing for sufficient recovery to optimize gains in strength, endurance, and performance on the trails.

Conclusion:

In the dynamic world of trail running, strength training serves as an important tool for unlocking peak performance, preventing injuries, and mastering the challenges of rugged terrain. By integrating strength training into your training regimen, you'll not only become a stronger, more resilient runner but also embark on a transformative journey of self-discovery and exploration. So, lace up your trail shoes, hit the gym, and prepare to unleash your full potential on those trails.

In trail running, the climb is always worth it once you reach the top. Here are some clients enjoying the reward!

Why Your Mobility and Stretching is Not Working

Unlocking True Mobility: The Power of Relaxation Over Force

In the world of fitness, the pursuit of improved mobility often takes a backseat to the prevailing belief of "harder, faster, stronger." Unfortunately, this mindset can lead individuals to overlook a crucial aspect of mobility training – the difference between forcing the body into a stretch and the transformative power of progressive relaxation. In this blog post, we'll delve into why your mobility training might not be working and explore the misconception that more effort always yields better results.


The Misconception of "More Effort = Better Results":

1. Fight or Flight vs. Rest and Digest:

One of the primary reasons more effort doesn't always translate to better mobility is the impact on the nervous system. More effort tends to activate the sympathetic nervous system, triggering the "fight or flight" response. When our nervous system perceives a threat, it tightens muscles and restricts movement, hindering the very progress we aim to achieve in mobility training.

2. Creating a Safe Environment:

Mobility work involves repositioning drills and stretching exercises to reach new ranges of motion. However, if the body interprets these positions as threatening, progress becomes stunted. For lasting improvement, it's crucial to create an environment where the body feels safe and secure, encouraging the activation of the parasympathetic nervous system – the "rest and digest" state.


The Sympathetic vs. Parasympathetic Nervous System:

1. Sympathetic Nervous System (SNS):

  • Activated during stress or perceived threats.

  • Triggers the "fight or flight" response.

  • Can inhibit mobility gains due to heightened muscle tension and restricted movement.

2. Parasympathetic Nervous System (PNS):

  • Activated during relaxation and rest.

  • Promotes the "rest and digest" response.

  • Facilitates improved mobility by reducing muscle tension and allowing for greater flexibility.

The Role of Controlled Respiration (Breathing):

1. Breath and Parasympathetic Activation:

  • Controlled breathing is a powerful tool to shift the body into the parasympathetic nervous system.

  • If you can't breathe comfortably in a position, you likely don't own it, and your body may interpret it as a stressor.

2. The Importance of Feeling Safe:

  • A relaxed state during mobility drills signals safety to the nervous system, allowing for greater adaptability and long-term improvement.

“I felt great for a few hours after my massage and then it went right back to what it was before”

- says almost everyone

The Missing Link: Training After Mobility Work

While mobility drills and breathing exercises are critical to unlocking new ranges of motion, there's a common mistake many people make – they stop there. Whether it's after a massage, physio, or chiropractic session, too often people experience temporary relief, only to have their body revert back within hours or days. Why? Because the nervous system hasn't been taught what to do with that new range of motion.

In order to retain and solidify the mobility gains you've just achieved, it's essential to follow up with training or neural stimulation. Your body needs to experience controlled movement in this new range so that it can "remember" and integrate it into your movement patterns.

Why Training Is Key:

When you mobilize, you're creating new possibilities for movement. But without reinforcing it through strength training or neuromuscular engagement, your nervous system doesn't fully integrate these gains. This often leads the body to revert to its previous, more limited movement patterns. By training after mobility work, you’re helping your body understand and use this new range of motion effectively, preventing the regression that so many experience.

Think of it this way: Mobility gives you the access to more range, and training teaches your body how to control and own that new range. To retain and sustain long-term mobility, it's crucial to follow the process of mobilize, then train.

Recap: The One - Two Punch

The key takeaway from the misconception of "more effort, better results" in mobility training is the importance of relaxation over force. However, once you've created a safe and relaxed environment for mobility, the next step is to train or engage in some form of neural stimulus to lock in that newfound range. By understanding the role of the nervous system and the value of progressive relaxation followed by structured movement, you unlock not just short-term gains but sustainable, long-term flexibility and functional movement.

Embrace the power of relaxation, and remember – mobilize, then train for lasting results.

For Free mobility videos click here or to book in a Free Onboarding Call click here.